|
| |
Part B: Overland Release, Street Conveyance (30 Minutes)
Analysis of drainage systems for large storm events will likely show that flow cannot be completely contained within your pipe system design. The most practical and accurate way to model this potential is with parallel conveyances at the street level.
Continue with LessonB2.jur and refer to the Lesson B system diagram. Dealing with the flow of water at street level requires modeling the path that the water would follow. This requires your engineering
judgment to determine courses of run-off which will be modeled parallel to your underground systems.
Profile View:
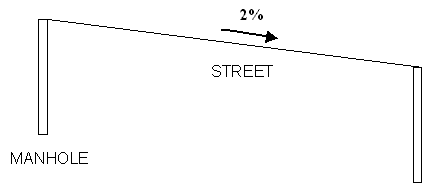
The water flows from the high point to the low point making flow modeling intuitive. However, the street flow must reflect the water that is also coming out of the drainage system from upstream in addition to that present in the street. CS Drainage Studio manages to adapt the two by mirroring street flow as a parallel conveyance.
Example Flow:
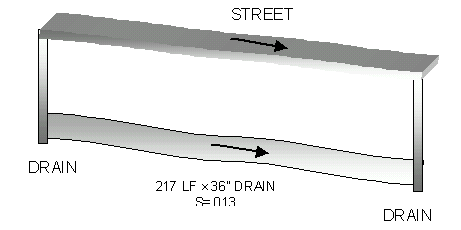
Hypothetically, under pressure and flowing full with a large storm event, the water overtops the drain inlets and flows downstream. In order to input the street flow you will manipulate parallel conveyances from manhole to manhole.
Bring up the conveyance S12A to S13A which corresponds to the first manhole to manhole conveyance in the organized list.
*Note to the User:
Drain inlet to manhole conveyances are generally not used for Overland Release because they run perpendicular to the street and flow. However, in situations where ponding is
occurring, some gutter flow modeling may provide better results.
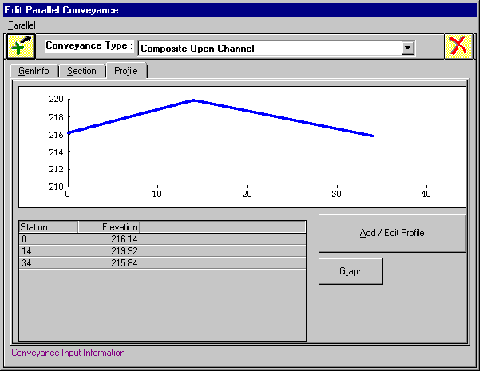
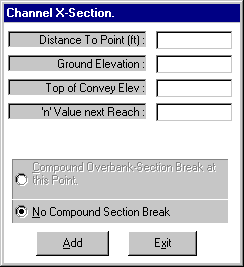
Move to the Parallel tab in the Add/Edit a Conveyance Facility Parameter window and proceed to add to the list. It is important to pick a conveyance type and profile that most closely approximate the actual dimensions of the street. In order to proceed with this tutorial, you must go into Conveyance Type and select Composite Open Channel.
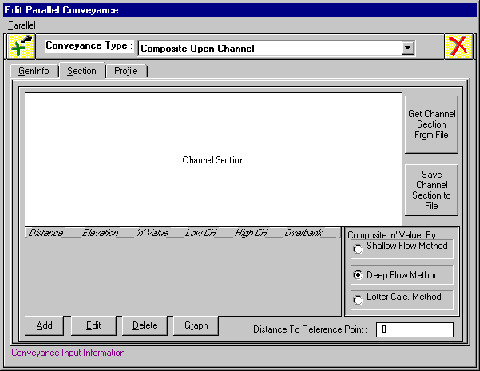
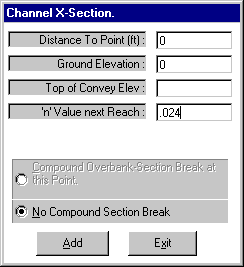
The desired channel section can be input to appear like the cross-section of the street you are analyzing. This can be accomplished by clicking on the
Add button in the bottom left corner. This will bring up the small window,
Channel X-Section.
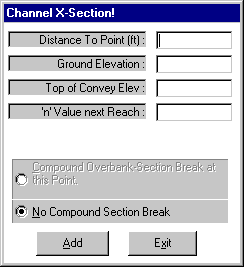
Utilizing the Channel cross section input window will allow you to create your own open channel conveyance as well as topped channel conveyances. In order to make the conveyance, you must define at least 3 points. The maximum number of points is 100 but seldom are so many points required.
The standard method of dealing with street conveyances does not involve developing your own conveyance cross section each time, which can be extremely time consuming. Instead, click on
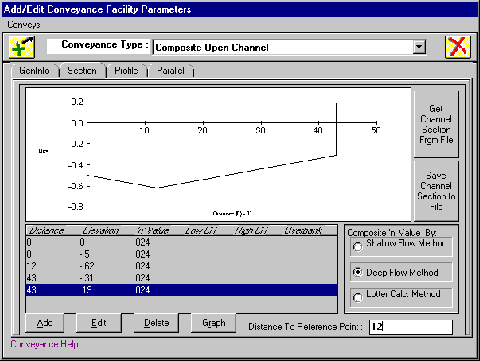
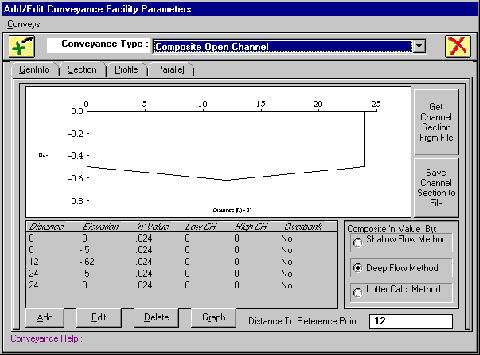
Get Channel Section From File and select Natskin.chn.
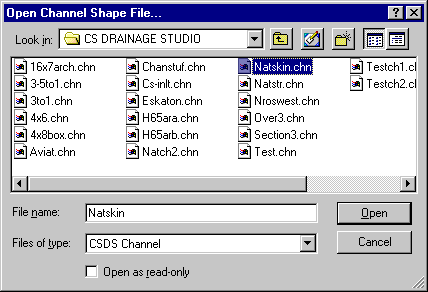
Once open, your screen should show the cross-sectional graph of Natskin.chn.
The correct window will show the following cross section.
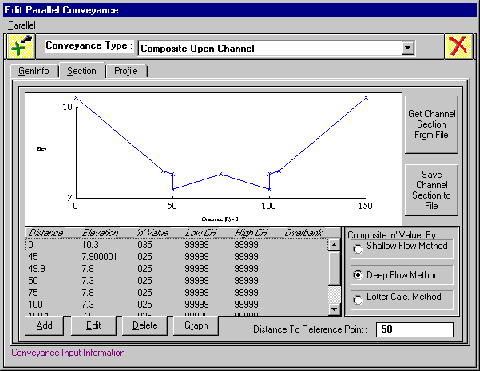
Notice that the points are predefined and that the general shape is that of a street with the curb at distances 50 and 100, centerline at 75 and the an overland slope leading to the curb on both sides. Of course you could redraw this cross section each time and manipulate it to serve your needs, but for most cases, you will create standard channel shapes and save them to a file, using them over and over again. The street section provided was used in North Natomas analysis of proposed residential streets.
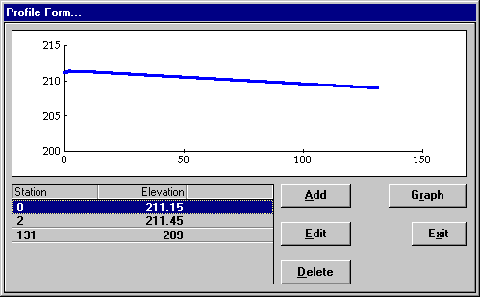
Take a close look at the Distance to Reference Point box in the lower right corner. This indicates that the reference point is located at 50 feet or according to the graph, exactly at the
flow line of the curb. The lowest point in the cross section of the channel should always be used for this value. Note also that cross sections (and profiles) always start at X-coordinate = 0.


The importance of the reference point placed at 50 permits the channel profile to match up with the elevation at the bottom of the curb. For this particular system, it matches up with the drain inlet grate elevations. Matching the bottom of the curb to the
flow line elevation correctly models the open channel to your street.

Modeling street conveyances as parallels along manhole to manhole connections was previously mentioned. However, when inputting the conveyance profiles of these parallels, it might be more appropriate to use the gutter
flow line elevations adjacent to their respective manholes as your profile points since that will be the natural path of the water in the street.
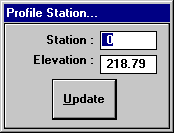
The current conveyance, S12A to S13A starts with a RIM elevation of 218.79. This first value in the profile corresponds with the manhole. If the drain inlets are staggered, choose the drain inlet closest and perpendicular to the manhole. The first profile station should be simple.
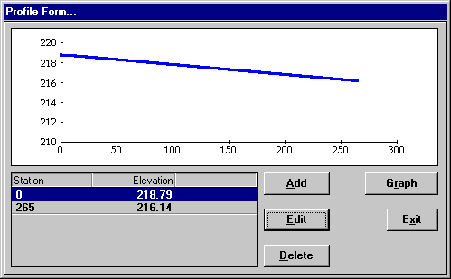
The second station is a bit more difficult to define. A basic method is to take the conveyance to the next drain inlet elevation, S13B. When finished, your window should match the tutorial.
Save the input for this conveyance and move on to S10A to S13A. Utilize the same technique as the previous parallel and then continue to the next conveyance, S13A to S14A.
The approach to this parallel is slightly different. One method is to take the elevations from S13B to the centerline of the street (calculated from manhole and 2% side slope for the street) and then on to the drain inlet S14.
Notice the high point (centerline) between the two inlets above.
The parallel from S14A to S15A looks straight forward but remember to input the flow line
at S15A which is not 211.90 but rather 211.50 from interpolation. After inputting the corresponding data treat S15A to S15B as a street parallel in this analysis. Generally drain inlets are not associated with parallel but in cases such as this (when the main flow of water proceeds through a drain) it makes sense to create a parallel. Lastly, input a parallel for the connection between S15B and S16 which is overland. A typical way of modeling this conveyance is to start at the drain and include the curb and path in the profile. Look to the next profile to clear up any confusion.
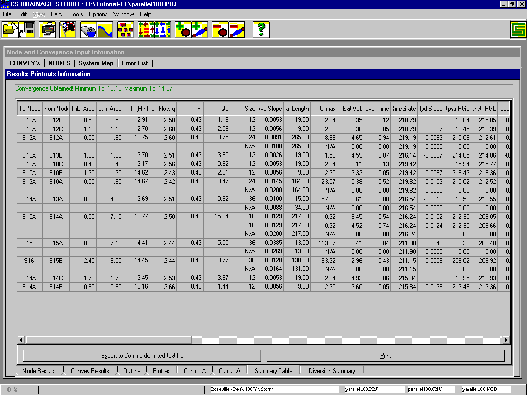
Change your jurisdiction file to ROSEV100.jur which is an appropriate 100 year storm event.
After a few calculations your summary table should have reached convergence.
Be sure to save your file as Bstreet.prj. Keep in mind that street parallel modeling requires engineering
judgment and there may not be one “correct” method. Some modeling methods give more accurate results, others more conservative results; it is up to you to decide and develop a method that best suits the project you are working on.
Part C: Overland Release, Parking Areas (30 Minutes)
Following on the heels of street conveyances, parking areas require more attention when using composite open channels. The issue of main importance is that each parking area must be created using the cross-section editor.
The parking area tutorial is an example of overland release with the main emphasis on learning to use the cross-section creator.
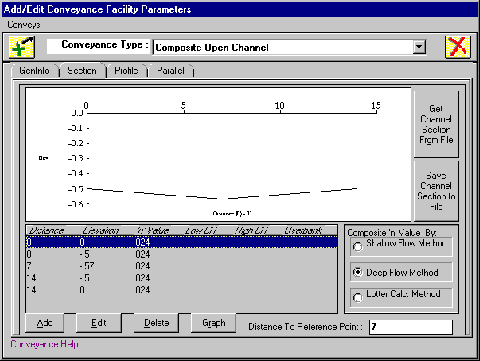
Start with a new project file (exit the program and re-enter it). Open the Add/Edit a Conveyance Facility Parameter window for Convey 1 and get a Composite Open Channel for your Conveyance Type.
This screen should look familiar from the previous section on parallel conveyances. This time however, the cross-section will be input by data points only and then saved.
*Note to the User:
Most analysis of parking areas will not require the detail that this tutorial goes into. Engineering a “typical” representative channel shape and using it throughout (like with the streets) will save on input time.
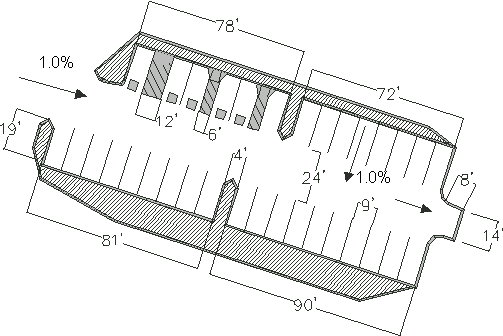 
The parking area for this demonstration contains 28 spaces and 5 handicapped spaces. The water flow originates at the left opening and proceeds down a 1.0% slope to the exit on the right while a side-slope of 1.0% drains the water towards the centerline.
Visualize the 2-D CAD drawing as a 3-D object, and use it to create cross-sections of various dimensions.
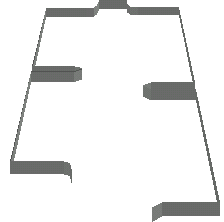
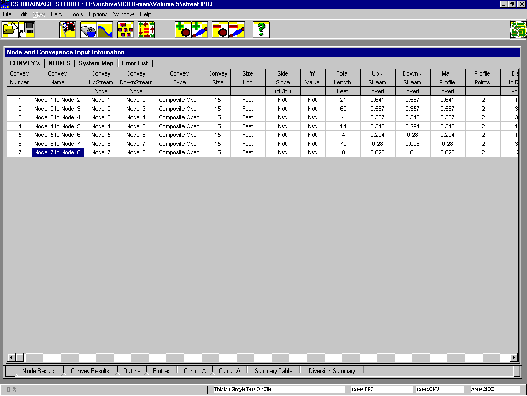
Eight nodes and seven conveyances are going to be used in preparing the project. The nodes are used in separating the points where the cross-section changes. These seven segments are going to be connected to form the entire parking area.
The total distance of the lot is 183’ so fix the grate elevation of the first manhole to 1.83 and the last node at 0 feet elevation based on the 1.0 % slope.
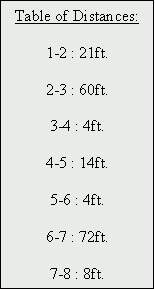 The table of distances to the right will represent the lengths of the conveyance segments. As an initial step, attempt to construct a cross-section for convey 1 which is currently open. Remember that your reference point corresponds to the place in the parking areas where the section will rest. A good rule to follow is to keep the reference consistent so the cross-section may be applied in future cases. In this example, making the centerline the reference point would give the same point of reference for each cross-section and might have applications in latter projects. For the purposes of this example, assume that all landscaped areas provide separate runoff allowing the parking area to act as a channelized response. The table of distances to the right will represent the lengths of the conveyance segments. As an initial step, attempt to construct a cross-section for convey 1 which is currently open. Remember that your reference point corresponds to the place in the parking areas where the section will rest. A good rule to follow is to keep the reference consistent so the cross-section may be applied in future cases. In this example, making the centerline the reference point would give the same point of reference for each cross-section and might have applications in latter projects. For the purposes of this example, assume that all landscaped areas provide separate runoff allowing the parking area to act as a channelized response.
*Note to the User:
All necessary values including heights and distances can be extrapolated from the diagram and the given data.
From your edit window, click on Add to bring up the point editor.
Use your general knowledge of cross-section entry to fill the blanks with the appropriate data from the diagrams and charts. The shape should be an identical match but the values do not have to be in the same place. Remember that the reference point for the duration of the tutorial will be at the centerline.
*Note to the User:
As long as the reference point is picked at the low point, it won’t matter if the cross-section contains negative values.
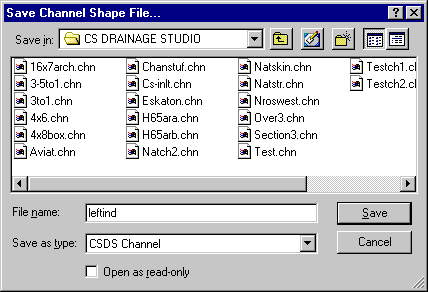
Once your diagram matches the figure in shape, save the channel section as leftind.chn, representing the portion of the parking area with a left indent.
Save that conveyance and move to convey 2. It’s your option to rename the nodes but for this simple tutorial it adds to the time necessary to finish without adding any constructive help.
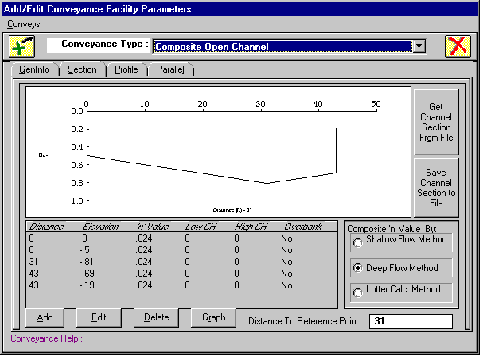
 Proceed to the cross-section editor and manipulate the next portion so it portrays a section across the entire parking lot. The first input will once again be the top of the curb modeled as point (0,0) since it makes the numbers easy to work with. The second data input is the bottom of the curb and the third is the centerline. When you have finished inputting all five data points your cross-section should appear symmetric. The reference point remains the centerline, but will shift to distance 31 feet in this section. Proceed to the cross-section editor and manipulate the next portion so it portrays a section across the entire parking lot. The first input will once again be the top of the curb modeled as point (0,0) since it makes the numbers easy to work with. The second data input is the bottom of the curb and the third is the centerline. When you have finished inputting all five data points your cross-section should appear symmetric. The reference point remains the centerline, but will shift to distance 31 feet in this section.

Save this section as standard.chn after pressing Save Channel Section to File.
As seen in the diagram, there are three remaining types of sections to construct. The first is a parking section where the curb indents on the right side and following the nomenclature this section file should be saved as rightind.chn. The next is a thin section with both a left and right indent which can be saved as fullind.chn for easy reference. If you are following the input method described in this tutorial, your cross-sections for these files should match those provided.
Now that sections have been created for conveys one through four, note that convey five has a left indent section. Since this section has already been constructed, simply get the channel section file while editing the conveyance. Convey six is similar in that it uses standard.chn which has already been made. Pulling these files from the hard drive is time effective and can significantly reduce the time necessary to analyzed more complex composite channels that have more developed cross-sections.
The last convey, number seven, is narrow and must be input. A simple procedure by now, add data points so yours matched this tutorial.
This section is very similar to standard.chn, but more centralized. Name this file center.chn and then save the conveyance.
With the difficult task finished, go to the main Node spreadsheet and fill in the grate elevations for each node. The slope of the parking area is 1.0% and the distance between
nodes (same as conveyance length) are given in a table. Calculate the values for elevation by hand, calculator, or computing device and type the largest value for node 1 decreasing till node 8 has 0 elevation height.
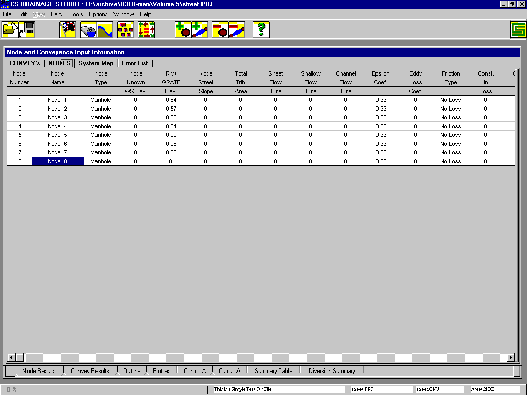
The last step to model the parking area is to define the conveys and provide the conveyances with profiles. The profile input should be simple since the station heights correspond to the node grates and the distance is the length between nodes. Check your Convey spreadsheet with the one provided.
The parking area has now been modeled, but as yet, no flows can be calculated. The development of the parking area has led to succession of conveyances running the entire length without any contributing areas or alternate systems. Many different circumstances could change this procedure if it were to be used in a real situation. Contributing flow could be integrated by either changing a manhole to a drain inlet or connecting the upstream node(node1) to an existing system that had flow. The parking conveyances could also be used like a parallel conveyance for overland release. Instead of adding a parallel to an existing conveyance, insert the parking area as an additional. Since the nodes are defined only for the conveyances just made, they won’t conflict with any underground manholes or inlets.
Quick and Dirty vs. Accuracy
Another way to model the parking area would be to use a triangular channel with a 1.0% (100:1) side slope the length of the parking lot. This would only be a more general approximation of the flow but is quicker and simpler than constructing a composite open channel. However, this channel would not model the converging flow where the parking islands encroach. Most cases will yield almost identical results as when a constructed composite channel was computed.
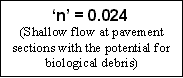
Advantages for making a composite open channel for parking areas exists when there are any changes in the ‘n’ value and where using a standard channel shape would be inadequate to properly show the conveyance.
Closing Comments
Parallel conveyances and multiple pipe culverts are essential in developing an accurate model for large storm events. They dictate where the flow will go above ground and are key in determining flood depths. Hopefully these tutorials on overland release modeling will help you utilize these features of CS Drainage Studio to their fullest capacity.
|
