|


| |
CSDS Manual
Comprehensive Combined
Hydraulics and Hydrology Software
Unit Peak Discharge Methods Version
For WINDOWS NT, 95 & 98 operating systems
User’s Guide
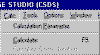
CSDS
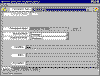
Toolbars
Quick Reference Guide

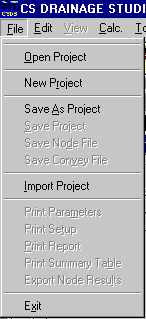
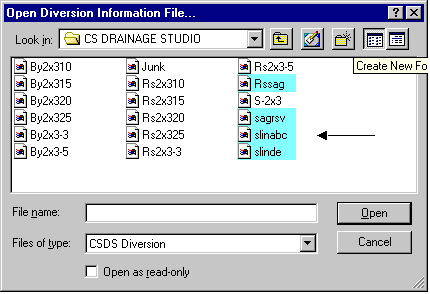
 Open File Menu
File Þ
Open Project
 Save File Menu Save File Menu
File Þ Save As Project
 Print Menu Print Menu
File Þ Print
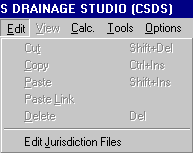
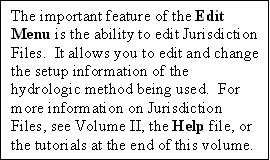
 Edit Jurisdiction Menu
Information Edit Þ
Edit Jurisdiction Files
 Manning Menu Manning Menu
Calculator Tools Þ Manning Calculator
 Backwater Menu Backwater Menu
Calculator Tools Þ
Backwater Calculator
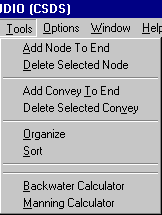
 Sort Menu
Tools Þ Sort
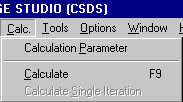
 Full Re- Menu Full Re- Menu
Calculation Calc Þ Calculate
 Single Calc Menu
Iteration Calc Þ
Calculate Single Iteration
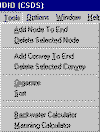
 Add Node Menu
Tools Þ Add
Node To End
 Add Convey Menu
Tools Þ Add Convey
To End
 Delete Node Menu
Tools Þ Delete
Selected Node
 Delete Menu Delete Menu
Convey Tools Þ
Delete Selected Convey
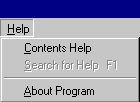
 Help Menu
Help Þ Contents
Help
Contents:
- Getting assistance for CSDS
- Breaking down the Manual
- How to contact Civil Solutions
- Installing the program
- Getting acquainted with the program
- Menu Explanations
- Toolbar Explanations
- How to Input Data
- Input Data For Nodes and Conveyances
- Learn to Calculate the System
- View Calculations Through Summary Table
- Changing Jurisdiction Files
- Editing Data to Reflect Changes
- Printing Hydrology Report
- Computing Inlet Response Time
- Checking for Convergent Solutions
- Modifying Calculation Parameters
- Inlet and Outlet losses for Pipe
- Box Culverts
- Advanced Culverts
- Multiple Pipe Culverts
- Overland release, street conveyance
- Overland release, parking area
- Types
- When and How to Use Each Type
TUTORIALS 7-11 ARE CURRENTLY BEING WRITTEN AND WILL BE AVAILABLE UPON
COMPLETION
- Basic Bypass Flow Inlet
- Slope Examples
- Sizing a Field Structure
- Inputting User Defined Shape Curves
- Organizing Data for Easy Input
- 10 yr. Analysis
- Checking for Errors using Outline Tab
- Overland Release Data
- 100 yr. Analysis and Response Times
- Interpreting 10 yr. and 100 yr. Summary Tables
- Optimizing for 10 yr.
- Optimizing for 100 yr.
- Finding Changes Between Plans and CSDS Input
- Inputting Changes
- Interpreting Changes in Summary Tables
Welcome to CS Drainage Studio, the increment based combined
hydraulics and hydrology software presented by Civil Solutions. The
intent of the User’s Guide series is to provide information, tips,
insights, and instruction to have you working quickly and efficiently
with CS Drainage Studio.
The CS Drainage Studio software provides comprehensive analysis of
urban drainage systems for "Unit peak discharge" type
hydrologic methods including: Rational Method, Unit q methods, SCS
Graphical Peak Discharge, Input Flow, Placer County SWMM, IDF Methods,
rating curve methods, and the LAG Methods.
BREAKING DOWN THE MANUAL
The User’s guide for the CS Drainage Studio software contains two
volumes. The User’s Guide should provide enough information to teach
the basic skills necessary to effectively use the software. While the
User’s Guide is comprehensive, any further advanced or specific
questions can be addressed to Civil Solutions.
The two volumes of the User’s Guide:
- Getting Started
- Tutorials and Appendix
If you are new to CS Drainage Studio, please review "Volume I,
Getting Started", in its entirety before using the software. This
volume provides the minimum working knowledge required to install, setup,
and use the basic features of the software.
If you are an experienced user of CS Drainage Studio (the ICHH-16
software name was used during the development of the program), please
review this manual to learn more about the latest features added to the
program and how to update files created with previous versions of the
software.
Volume II, Tutorials, offers tutorial lessons on the full range of
the software’s capabilities and use. Volume II contains sample
projects that are presented using real world design situations. The
user is shown step by step instructions using CS Drainage Studio to
perform the analysis of drainage systems.
GETTING ASSISTANCE
If at any time during setup, navigation, or operation of CS Drainage
Studio, you have questions, there are several resources for additional
information and assistance. They include the manual index, the Help
file, and direct assistance from Civil Solutions.
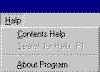
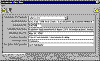
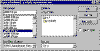
Help File
From within the software:
- Click Help Þ Contents Help or
- F1
for context sensitive help
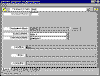
A comprehensive context sensitive Help file is provided with the
standard installation of the CS Drainage Studio software. Shown above is
the main help window. If you are not familiar with using WINDOWSÔ
Help file systems consult your WINDOWSÔ user
manuals for additional information on using help files
CONTACTING CESI
U.S. Mail or email
- Civil Engineering Solutions, Inc., 1325 Howe Avenue Suite 202,
Sacramento, CA 95825
- mailto:support@civilsolutions.com
Back to Top
GETTING STARTED
In order to
take full advantage of CS DRAINAGE STUDIO, it is important to correctly
install it on computers that meet the minimum system requirements. To
run CS DRAINAGE STUDIO, you should have at least a 486/66
microprocessor, 16 megabytes (MB) of memory and 10 megabytes of hard
disk space. When using CS DRAINAGE STUDIO to analyze complex systems,
including parallel flow paths and diversions, the software should only
be installed on computers with processor speeds in excess of 150 MHz.
Read ahead for installation information on individual and networked
computers.
Install CS DRAINAGE STUDIO on your Computer
To run setup, you need to be using Windows NT or 9x . This software
is intended for 32 bit operating systems and may not run correctly on
Windows 3.1, 3.11 or DOS. During the installation process you will be
able to choose the directory where you want to install CS DRAINAGE
STUDIO. Installation may be accomplished with 3.5-inch disks, a compact
disc, or a network location.
To install CS DRAINAGE STUDIO in WINDOWS
98, 95 and NT Workstation 4.0
- Start WINDOWS
- Close all other programs
- Insert the CS DRAINAGE STUDIO INSTALLATION CD or floppy disk into
the appropriate drive
- Click Þ Windows Start Þ
Run
- In the Open box, enter the drive location of the CS DRAINAGE STUDIO
disc. Type the drive letter, followed by a colon, backslash and setup.exe.
(for example c:\setup.exe)
- Click Þ OK
- Follow the instructions that appear
- Re-boot your system following program installation
Note: You may receive a "sharing violation" error during the
installation process labeled MSVCRT.dll and MFC42.dll. Press Ignore
to pass through this error and continue with the installation. For
additional help installing programs, please refer to your WINDOWS
documentation.
Install CS DRAINAGE STUDIO on a Network
Network installations require a special licensing of the software for
multiple users.
Note: If your software does not say "Network
Version" or contain a "Netsetup" directory on the
installation disk, we don’t recommend that you attempt a server based
installation.
For server based installations, follow the special installation
procedure provided for the server computer and the workstations. Special
installation instructions are provided with network versions. Further
assistance can be found through your network administrator or with
WindowsÔ support.
How Do You Register CS DRAINAGE STUDIO?
Registration will allow you to be notified of future product updates,
and download availability for extended help, tutorial lessons, and
software updates.
To become registered at Civil Solutions, simply fill out your
registration card enclosed with the software and send it to:
Attn. CSDS Registration
Civil Solutions
1325 Howe Avenue, Suite 202
Sacramento, CA 95825
Starting the Program
Start CS DRAINAGE STUDIO in WINDOWSÔ 95,
98 or NT
1. Click
Þ WINDOWSÔ Start, then go to
Program Files
2. Click
Þ CS DRAINAGE STUDIO ,
then click Þ CS Drainage Studio (in the sub-menu)
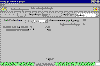
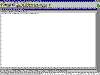
Once the program has been opened, a screen similar to the one below will
appear:
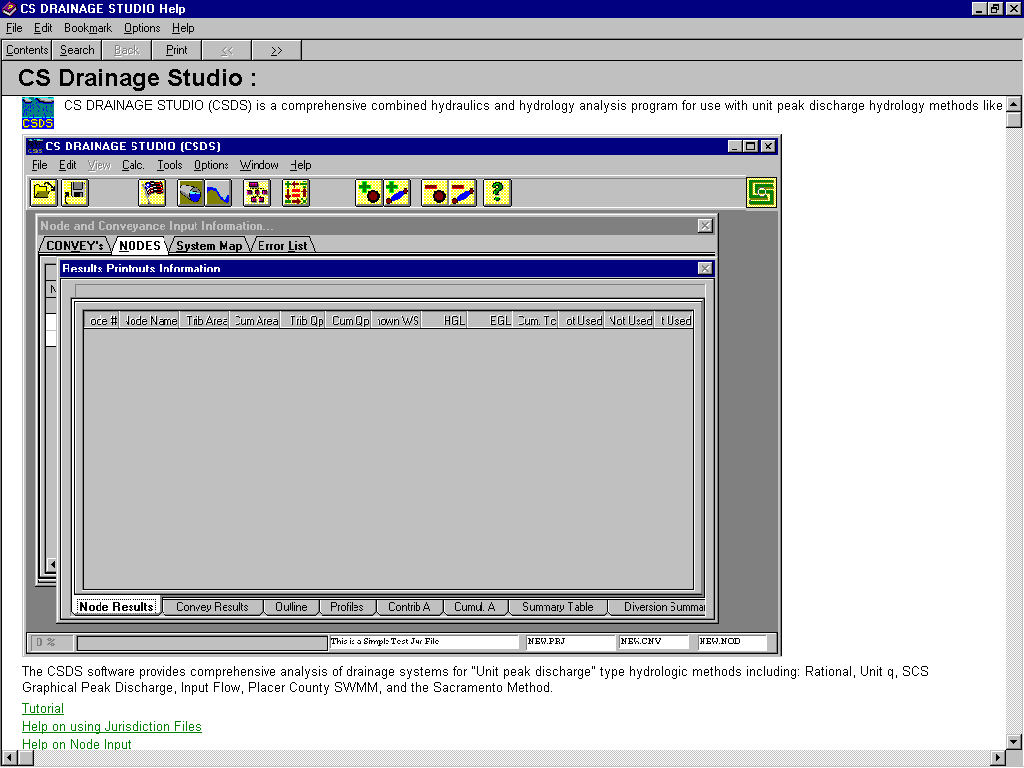
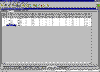
Figure 2.1 The CSDS Main Window
From the Main Window, all the tools and properties of CS Drainage
Studio can be utilized.
3. To exit from the program, click Þ Exit,
under File menu.
Note: Exiting the software through the ‘X’ button in the upper right
hand corner may not fully remove the program from memory. This may cause
system operation problems. You can prevent this by exiting the software
through the File menu Back to Top
USING YOUR APPLICATION

CS Drainage Studio
(CSDS) contains a number of helpful tools. Once the main window of the program
is open, acquaint yourself with the setup. The dual forms for the input and
results data may be confusing at first, but the separation of these elements
is a key to organizing the program. While incorporating a complex mathematical
engine suited for performing integrated hydraulic and hydrology analysis, CSDS
has been designed with a simplified user interface.


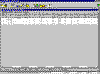
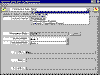
Figure 3.1 The CSDS Main Window
The main navigation in the CSDS environment is through the Menu Bar and
the Toolbar. All CSDS commands can be accessed through the Menu Bar. The
Toolbar contains an array of frequently used commands.
Menu Bar

The bar, located at the top of the main screen, provides a menu from
which you operate the program. (Please note that the View menu is not
highlighted, nor will it be any time while the program is open. The View
menu will be an integral feature of a future edition of this software
featuring a graphical interface.)
File Menu
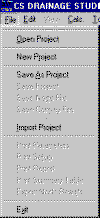
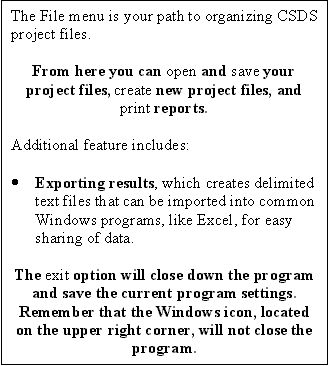
Menu functions such as the Print function may not be available when you
first enter the program. The software automatically activates and
de-activates Menu functions based on the status of your project. If you
are starting a new project from scratch, click on New Project. If you
wish to edit a project or save a project, use the corresponding
commands.
When a command in the menu is not in bold print, then it is not
available during the current project input or output phase.
Node and Convey files are associated with projects. The software allows
you to export/import node and conveyance information. This allows you to
share information between multiple projects.
Tips
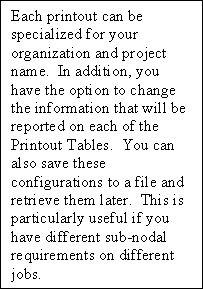
Print button in the File Menu creates printout reports.
To print summary data, click the print button on the Summary
Table page of the Results form.
Edit Menu
The Edit Menu provides common Windows features such as cut, copy, paste,
and delete. These functions perform access to the Windows clipboard.
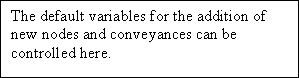
Calc Menu
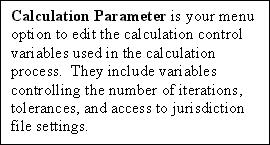
In addition to changing the jurisdiction file (hydrologic method), you
will be able to control the maximum number of iterations the program
will use compute to your data. Other features that may be altered are
tolerances, enabling flow diversions, flow time, and control limits.
These topics are covered in the second and fifth volumes of the manual.
Tools Menu
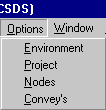
Options Menu
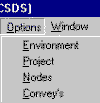
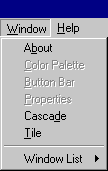
Window Menu
Help Menu

The Help Menu is designed to get you assistance while you work, without
leaving the software. It effectively increases your productivity by
reducing the time you spend in learning the program with a help index.
In conjunction with the multiple tutorials, the contents of the help
menu provide you with assistance for many CSDS functions and information
relative to your project. The program help is context sensitive,
utilizing the ‘F1’ key at any time to automatically display help
information about the current window.
Toolbars
The Toolbar across the top of the main screen offers a quick way to
access many of the most commonly used functions.

The following identifies the features of each of the icon buttons:
Open File Menu
File Open Project

The Open File button performs the same task as the FileOpen menu
sequence. This button will bring up the “Open File” dialogue box
from which you choose the file from a list.
If you select a file while a different project is open, the current
project information will be replaced by the information contained in the
selected file.
Save File Menu
File Save As Project

The Save Project button will bring up the “Save File As” dialogue
box. You then may type in the name of the file, and directory location
that you want the file to be stored as. The menu option File
Save Project saves the project with its current name.
Print Menu
File Print

The Print Results Report button performs the same task as the FilePrint
menu sequence.
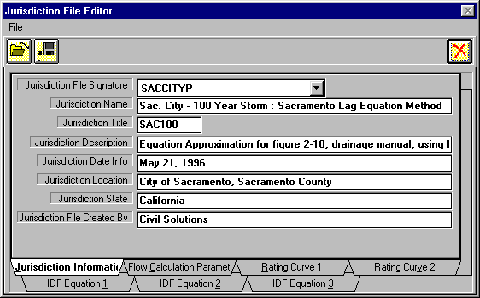
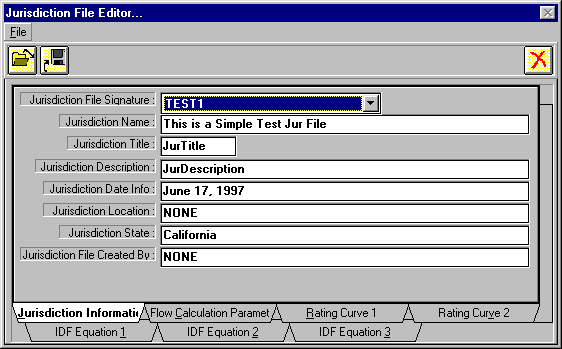
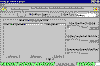
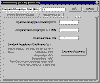
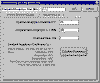
Edit Jurisdiction Information Menu
Edit Jurisdiction
Files

The Edit Jurisdiction Information button performs the same task as the
EditJurisdiction File menu sequence. This button will show the
Jurisdiction File Editor. Within the editor, you change jurisdiction
files, edit the current jurisdiction settings (hydrology settings) and
save your jurisdiction settings to a file for use on another project.
Civil Solutions provides a database of currents jurisdiction files with
your software installation. A complete current database is available for
download at www.civilsolutions.com.
Manning Calculator Menu
Tools Manning Calculator


The Manning Calculator button performs the same task as the ToolsManning
Calculator menu sequence. This button will display the Manning
Calculator utility, which is included with the standard installation of
this software.
Backwater Calculator Menu
Tools Backwater Calculator


The Backwater Calculator button performs the same task as the ToolsBackwater
Calculator menu sequence. This button will display the Backwater
Calculator utility, which is included with the standard installation of
this software.
Sort Menu
Tools Sort

The Sort button performs the same task as the ToolsSort menu
sequence. This button will perform a pre-calculation sort, and display
the results of the sort on the Results-Outline page. You do not have to
input nodes and conveyances in any particular order. The program will
automatically arrange the order you have them connected. Also, the sort
function performs several pre-calculation tests of the input to verify
that adequate information has been provided. If errors are found,
information is displayed on the Error List page of the Input Form.
Full Re-calculation Menu
Calc Calculate

The Full Re-calculation button performs the same task as the CalcCalculate
menu sequence. The full calculation will re-initialize all results
variables, and begin iterating a solution.
Once you have pressed the full re-calculation button, a parameter
window, showing your current calculation parameters information, will
appear. Adjust the settings, as per your specifications, and press Save
to continue. The program will then perform calculations on your data
that can be monitored with the status bar in the bottom left corner of
the screen. It will generally cycle through the status bar three or four
times before coming to a stop. The calculations will then be finished
and under the summary tab, the results can be viewed.
Pressing the calculation button with the red arrows will perform a full
set of calculations. After editing or inputting data, this utility must
be used to initialize the calculation process. Each additional
calculation may then be performed by a single iteration (the blue arrows
button).
Single Calc Iteration Menu
Calc Calculate Single Iteration

The Single Iteration button performs the same task as the CalcSingle
Iteration menu sequence. Only one single calculation iteration will be
performed when using this button.
Following your initial calculation, the blue arrows button will become
highlighted in the toolbar. Often complex projects require several
iterations to reach convergence. Convergence of the system is monitored
at the top of the Results Form. During calculations, a line is displayed
which reports the convergence status. If results have not converged, the
location and amount of the largest change is displayed. If your project
does not reach convergence in a reasonable number of iterations, then
consult Volume II on information on the calculation parameters. Usually,
redefining one of these parameters will result in convergence.
Add Node Menu
Tools Add Node To End

The Add Node button performs the same task as the ToolsAdd Node
to End menu sequence. This button will add one new node to the end of
the Node Listing.
In order to edit the node you have just created, scroll down the node
spreadsheet until you come to the node. There are two ways to recognize
the new node:
1 It’s at the very end of the spreadsheet list
2 The name it is given will say NODE ##
Double clicking on this node name in the spreadsheet will send you to
the node editor. For further help, see Tutorial 1.
Add Convey Menu
Tools Add Convey To End

The Add Convey button performs the same task as the ToolsAdd
Convey To End menu sequence. This button will add a conveyance to the
end of the file.
Much like a node, in order to edit the conveyance you have just created,
scroll down the node spreadsheet until you come to the conveyance. There
are two ways to recognize the new conveyance:
1 It’s at the very end of the spreadsheet list
2 The name it is given will say CONVEY ##
Double clicking on this conveyance name in the spreadsheet will send you
to the conveyance editor. For further help, see Tutorial 1.
Delete Node Menu
Tools Delete Selected
Node

The Delete Selected Node button performs the same task as the ToolsDelete
Selected Node menu sequence. This button will delete the node which is
currently selected on the Node Input Table.
Delete Conveyance Menu
Tools Delete Selected Convey

The Delete Selected Conveyance button performs the same task as the
ToolsDelete Selected Convey menu sequence. This button will
delete the conveyance which is currently selected on the Conveyance
Input Table.
Help Menu
Help Contents Help

The Help button will retrieve the CSDS Help file.
Civil Solutions Menu
Help About Program

When you click this icon, information about the software you are using,
and Civil Solutions will be displayed.
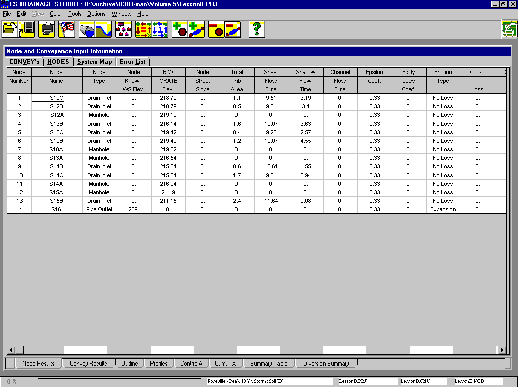
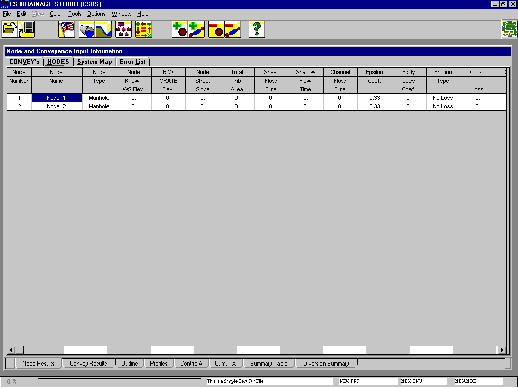
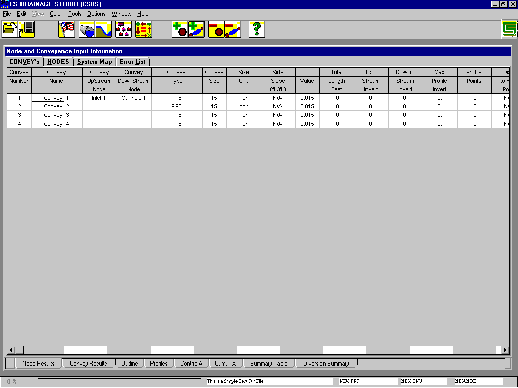
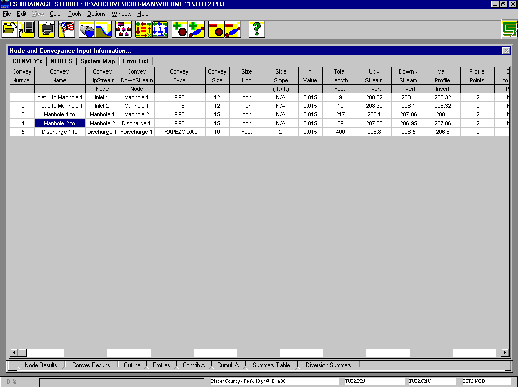
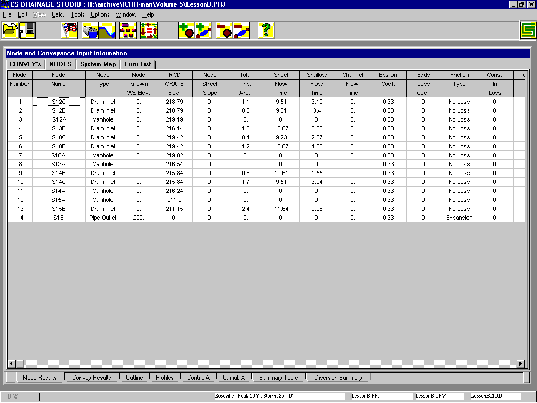
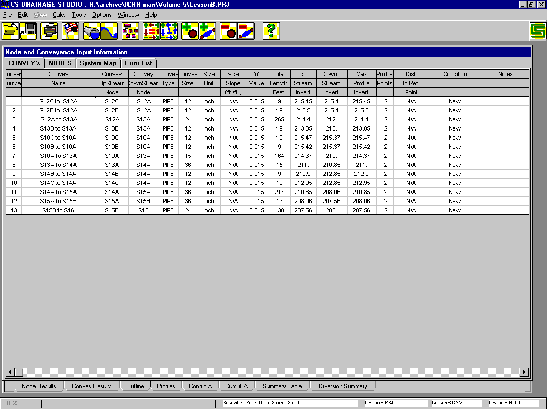
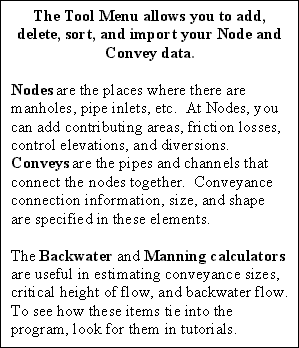
Input Forms
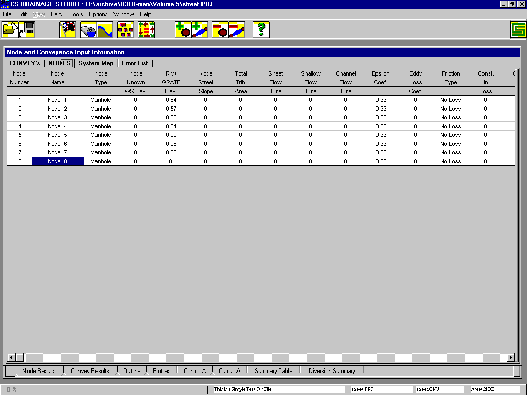
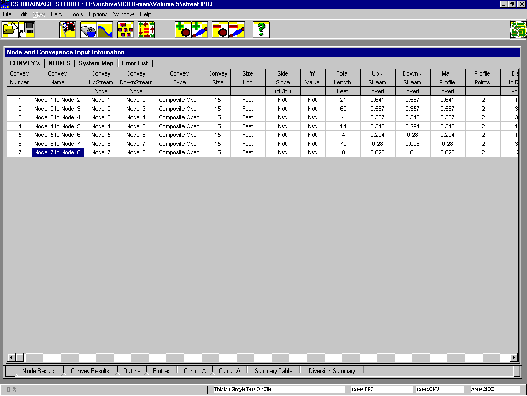
Node and Conveyance Input Information
1 Nodes
When you first start CSDS, the initial setting will highlight the Nodes
tab of the database. Values of variables for each node are shown in the
spreadsheet. You can edit these values in the Node Editor by
highlighting the node and double-clicking it, or pressing the “Enter”
key.
2 Conveys
The conveyance spreadsheet lists all of the conveyances linking the
various nodes. You can edit these values in the Conveyance Editor by
highlighting the conveyance and double-clicking it, or pressing the “Enter”
key.
3 System Map
In the current version of CSDS, the system map is inoperative. This page
is simply a place card for a graphical editor interface, which is
planned for future software additions.
4 Error List
The Error List page gives you a complete listing of any errors and
warnings that occurred while the program was sorting or calculating your
data. Warnings may be displayed relating to your calculation parameter
settings, which may assist in convergence. Connection errors and
tolerance warnings are also displayed here. Look in the tutorial section
or the help menu for more complete information on troubleshooting
errors.
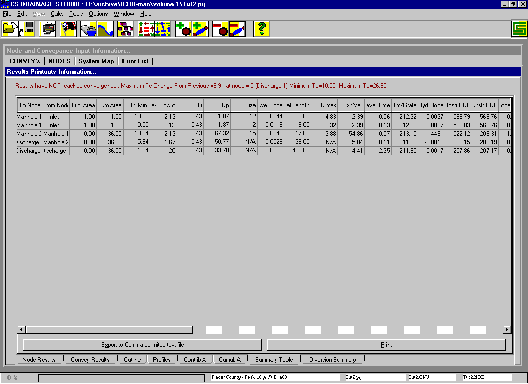
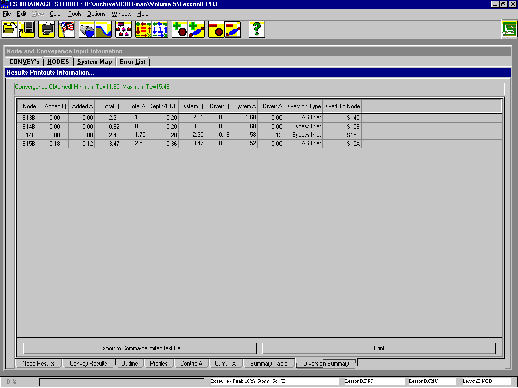
Results Forms
1 Node/ Convey Results
lists computed results for nodes and conveyances
2 Outline
shows the order that the nodes are connected
3 Profiles
lists the elevations of the conveyance profiles
4 Contrib. Area
lists the contributing area at each node by area type
5 Cumul. Area
lists the cumulative area at each node by area type
6 Summary Table
comprehensive summary of the results listed by conveyance.
7 Diversion Summary
lists the results of the bypass/sag inlet diversions by node
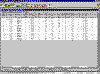
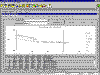
Summary Table in-depth
The summary table contains valuable information on the data calculated
from your original nodes and conveyances.

Project Status Bar
1 Status Indicator
Located at the left side of the application bar, the status indicator
will expand in accordance with the portion of the calculation completed.
Often the bar will cycle a few times, since the calculations are
iterated more than once. On faster computers (Pentium II), the time it
takes to complete all calculations on a fifty-node project is around ten
seconds. Slower computers (486 and Pentium) will experience a longer
wait period due to the complex nature of the calculations.
Besides showing calculation time, it will also show progress for file
load and save commands.
2 Jurisdiction
In the center of the Application Bar lies the name of the current
Jurisdiction file that you are using.
3 File Names
On the right of the Bar is the name of the project file.Back to Top
TUTORIAL 1 - BASIC DATA INPUT
Now that the initial software features have been explained, This section will demonstrate the use of CS DRAINAGE STUDIO in a real world design situation. Tutorials one and two have been designed to take you step-by-step through the process of inputting a simple street drainage system, to viewing your pipe network, and finally to interpreting your calculated results.
Note:
All tutorials are provided to show the user typical methods of data input. The software requires the user to use their own “engineering
judgment” in determining the correct methods to be used for each project.
Tutorial 1 (30 Minutes)
QUICK REFERENCE GUIDE
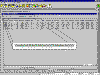
The first tutorial consists of a local street collection system which outlets into an open channel. Inputting and running the analysis for the simple drainage system diagrammed below will teach you the basics of inputting data. The same methods are used for large drainage systems, and with practice you will get much faster at inputting the data and interpreting the results.
In the street sections diagram, nodes are represented by manholes and drainage inlet symbols and the conveyances connecting them are represented by pipes. Each node is given a set of values to be input in the program. The descriptive values for the pipes are the length and size given in boats and above the pipe. The value in the boat is the pipe diameter in inches, while the number above is the length of the pipe in feet. Although each node is numbered, the order in which you enter them into the program is irrelevant.
The Organize command will order the nodes automatically according to the connections described in the input conveyance data. This topic will be explored in the tutorial after you have inserted all the data for nodes and conveyances.
Starting a New Project
6 Open CS Drainage Studio
7 From the File Menu, click New Project
8 Adjust the spreadsheets to fit your screen or preference. These settings will automatically be recalled when you subsequently open the program.
9 From the Edit Menu, click Edit Jurisdiction Files
(or click on the flag icon in the Toolbar)
10 Once in the Jurisdiction File Editor, move to File and Click Open
(or click on the open file icon in the editor)
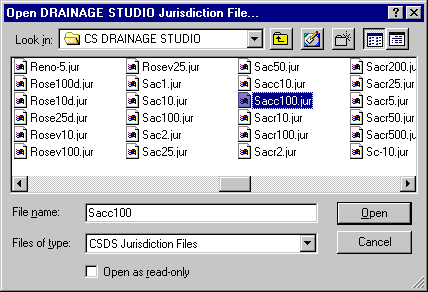
11 From the Open Jurisdiction File window,
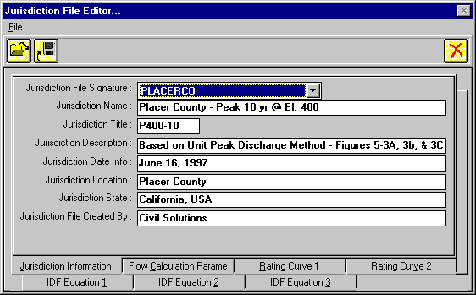
choose the Jurisdiction File “SACC100.JUR”. This is the Jurisdiction File for the Sacramento Charts Method 10-year storm event. Double click on the file name, or click the OK button.
 Click on the X icon to exit from the jurisdiction editor. Your jurisdiction file choice will be saved with the current project.
Now you are ready to begin inputting data into the spreadsheets.
7. Inputting Node Information
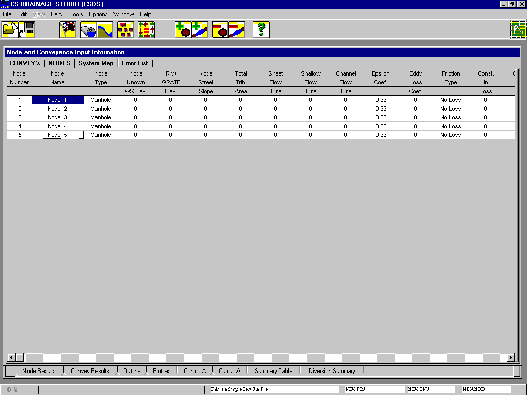
Beginning with the “Nodes” Input Sheet, click on the NODES tab.
 You may notice that two nodes are
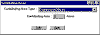
already listed. This is the default setting for new projects. Since the street section has a total of five nodes, you will need to add three more. This can be accomplished by clicking on the Add Node icon three times, each click corresponding to the addition of one node. After adding three nodes, the spreadsheet will appear like the following figure:
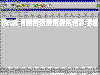
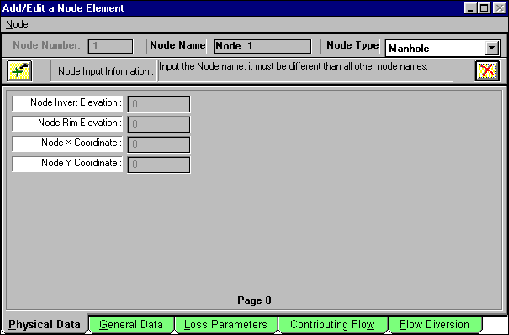
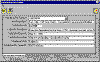
Now that you have made five nodes for your project, you will input the data from the diagram into the parameters for each node. Move your cursor to any cell in the first row and double click. This will bring up the Add/Edit a Node Element window.

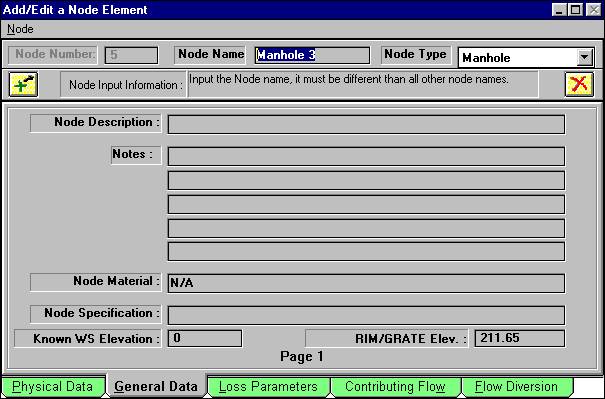
The tab page Physical Data, which should be highlighted by default, is where you should start inputting your data (you may move in this environment with the mouse arrow or the tab key). For clarity, this manual will input the data according to the numbers at each node (i.e. node 1 will have the corresponding node with number 1 from the diagram).
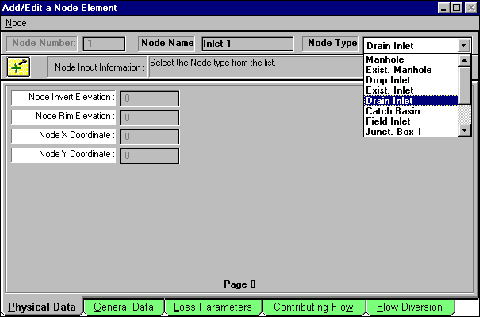
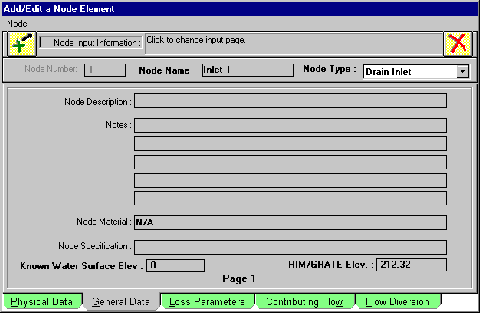
According to the street diagram, number 1 is a drain inlet. Click on Node Name and type “Inlet 1” for the name. Choosing a name is arbitrary, but select a name significant for the node and corresponding to the diagram. Each node is required to have a unique name.
Now click on Node Type and select drain inlet.
You may notice that the column of elevations and coordinates on the left are not editable. Their function will be discussed in Volume II and used in the Volume V tutorials. For now, move on to the General Data tab page and type in the value of 212.32 for the Rim/Grate Elevation.
You can leave the rest of the page blank or input notes, etc… in the appropriate blanks. Those topics will be covered in Volume II.
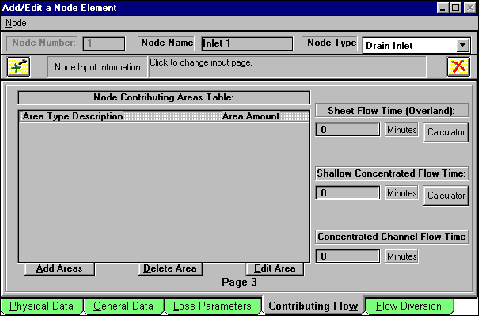
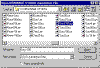
The Loss Parameter tab is an advanced topic, which will also be covered later. For now, move on to the Contributing Flow tab.

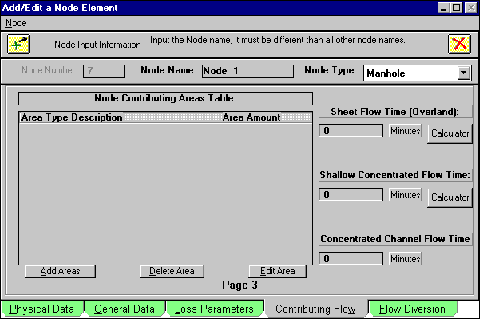
Click on the Add Areas button. This is where you will input the Contributing Flow to node 1.
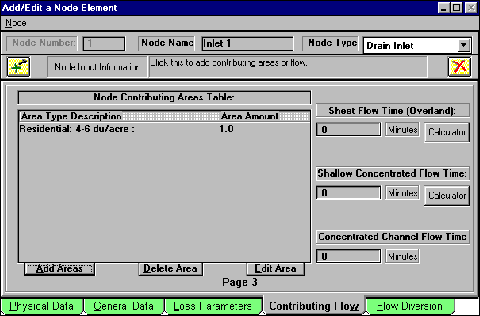
Scroll down to the residential land uses in the Contributing Area Type list box, and click on the 4-6
Du/Acre land use type, as indicates on the tutorial diagram.
Add Type in the amount of contributing flow area (1.0 Acre), and click the button. This will return you to the Add/Edit a Node Element window.
The Sacramento Charts Method is not a Response Time dependent hydrological method. For this method unit flows are computed based on total contributing area and land use type. If you were using a response time dependent hydrological method you would input the inlet response time (reported as 10 minutes in the tutorial diagram) in one of the three response time windows shown above. For this tutorial, type 10 minutes response time under Sheet Flow Time for Inlet 1.
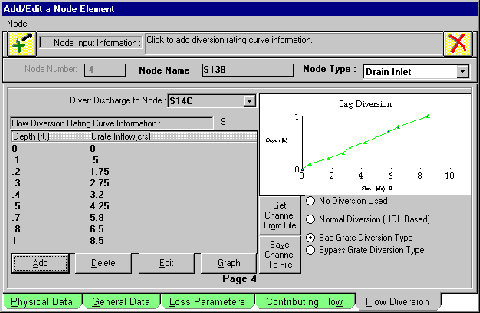
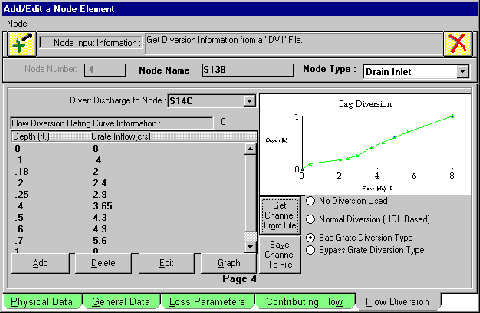
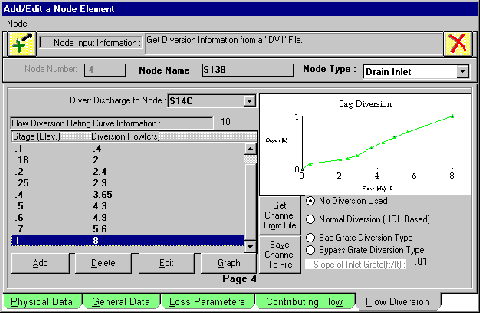
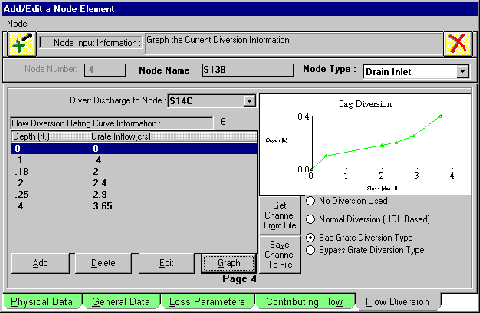
All the essential node information has now been entered into the program. The next tab Flow Diversion, is an advanced subject discussed in Volume Two
Click on the save (green plus) icon to add the information to your spreadsheet. If you had pressed the exit without
saving (red X) icon the editor would close without updating the data you had just entered.
After clicking on the plus, you return to the main window. The information in the row “node 1” has now been changed to the values you entered.
Continue to add the rest of the nodes, two through five, in exactly the same manner.
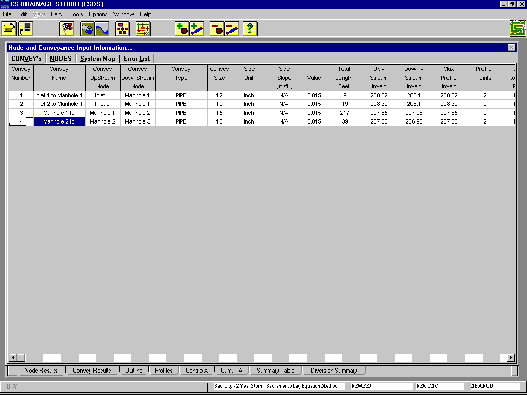
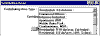
The Node spreadsheet should appear as below when you have finished.
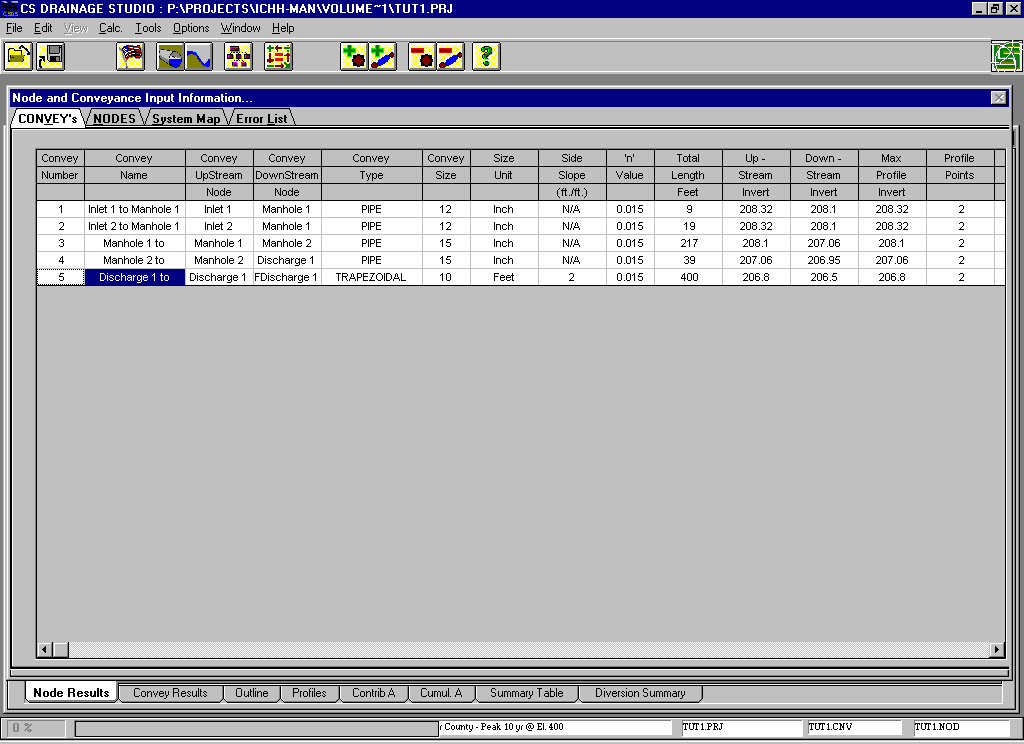
Now that the nodes have been properly inputted, let’s move on to conveyances by clicking on the CONVEY’S tab.

From the diagram four pipes segments will be needed. Accordingly, you will need four conveyances. Click on the Add Conveyances icon three
times for three new conveyances to be added (since one exists as the default, only three additional are necessary).
You may notice that two node names are printed in the row next to Convey 1. This simply means that inlet 1 is connected to manhole 1. That is the case according to our diagram, but if it wasn’t, simply edit the conveyance to make the correct connection.
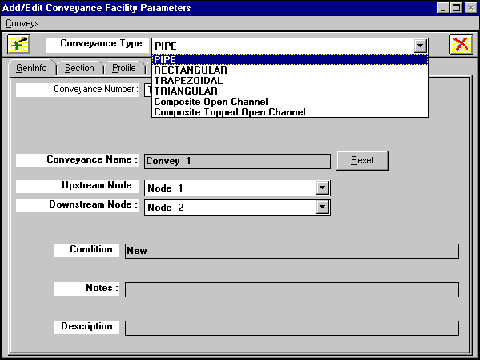
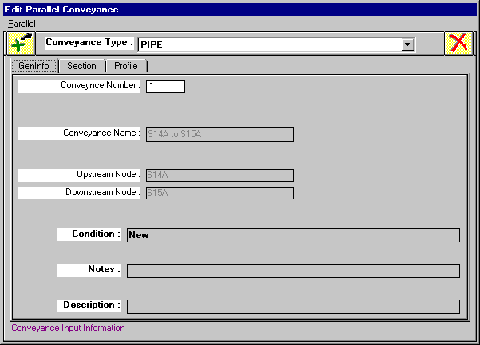
First, double click on the first row of the table, Convey 1.
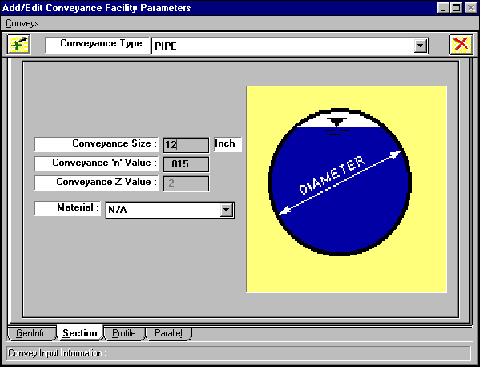
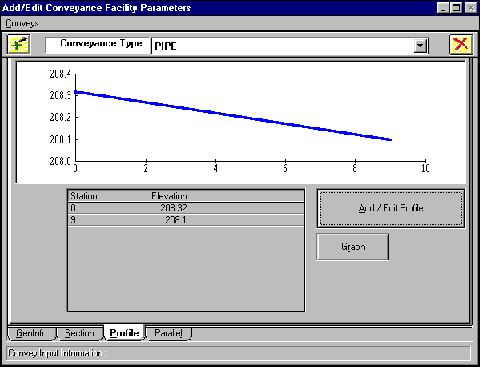
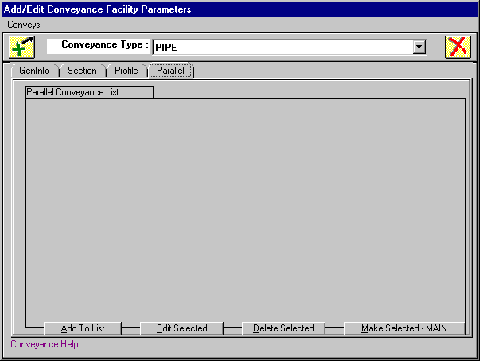
In the Add/Edit Conveyance Facility Parameters window you can change the name and information for the pipes. Clicking and scrolling on upstream and downstream node buttons permits you to choose which nodes will be attached by the conveyance (pipe). Pressing the Reset button will automatically change the name of the conveyance to reflect the two end nodes (i.e. Node 1 to Node 2. The nodes are set properly so move on to the Section tab.
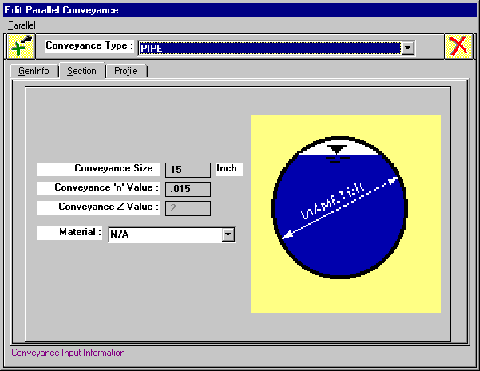
According to the street diagram, the diameter of the pipe is twelve inches.
The Conveyance Type at the top of the current window is selected as pipe. Scrolling down this block will permit you to use different channel types (covered in Tutorial 2).
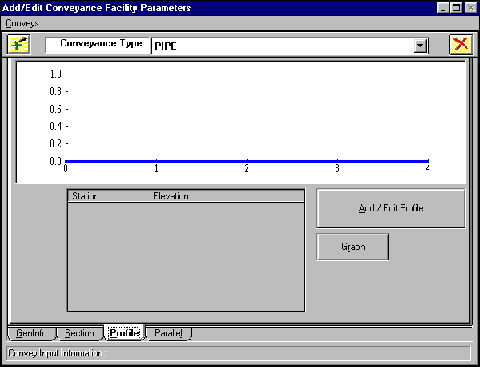
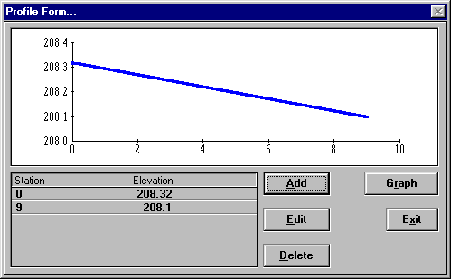
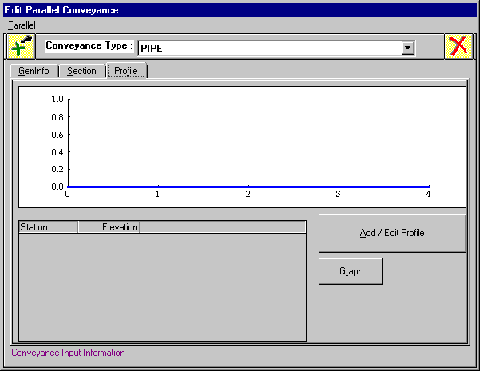
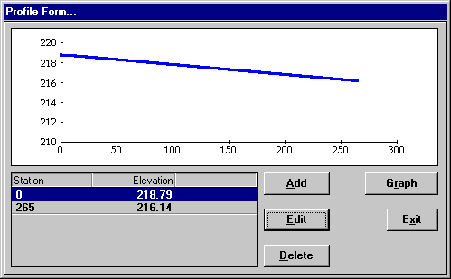
Moving to the Profile tab, you will encounter a blank graph.
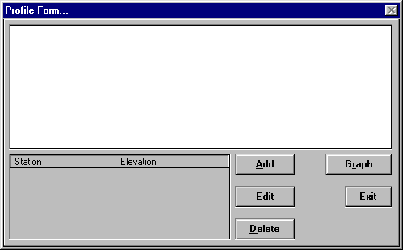
Click on Add/Edit Profile to bring up the Profile Editing Form.
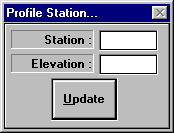
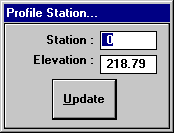
Click on the Add button and the Profile Station Editor will appear where you can input the length of the pipe and the invert elevation at each node.

Input the flow elevation as defined for each node in the diagram. Always input a 0 for the upstream station and the length of the pipe at the downstream station. For each pipe, you will have at least two stations, the origin and the termination. According to the diagram, the pipe length is nine feet. Your profile should match the one below when you have completed entering the pipe information:
Press the Exit button to go back the Add/Edit Conveyances window. The graph in this window should be updated to match the one just created.
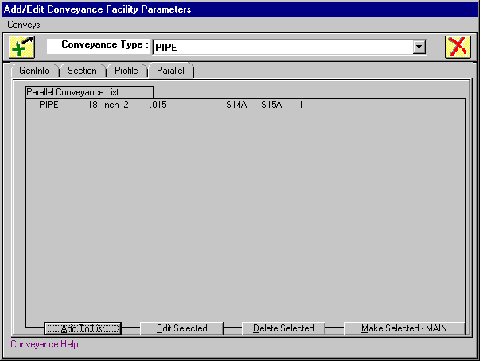
For this tutorial we won’t worry about inputting information on the Parallel tab page. This page is reserved for inputting parallel flow paths. It will be covered under more advanced topics.
Click on the save (green plus) icon to add the conveyance information to the spreadsheet. Conveyance 1 is finished.
Input the rest of the conveyances in the same manner until you have a spreadsheet that looks like the one below:
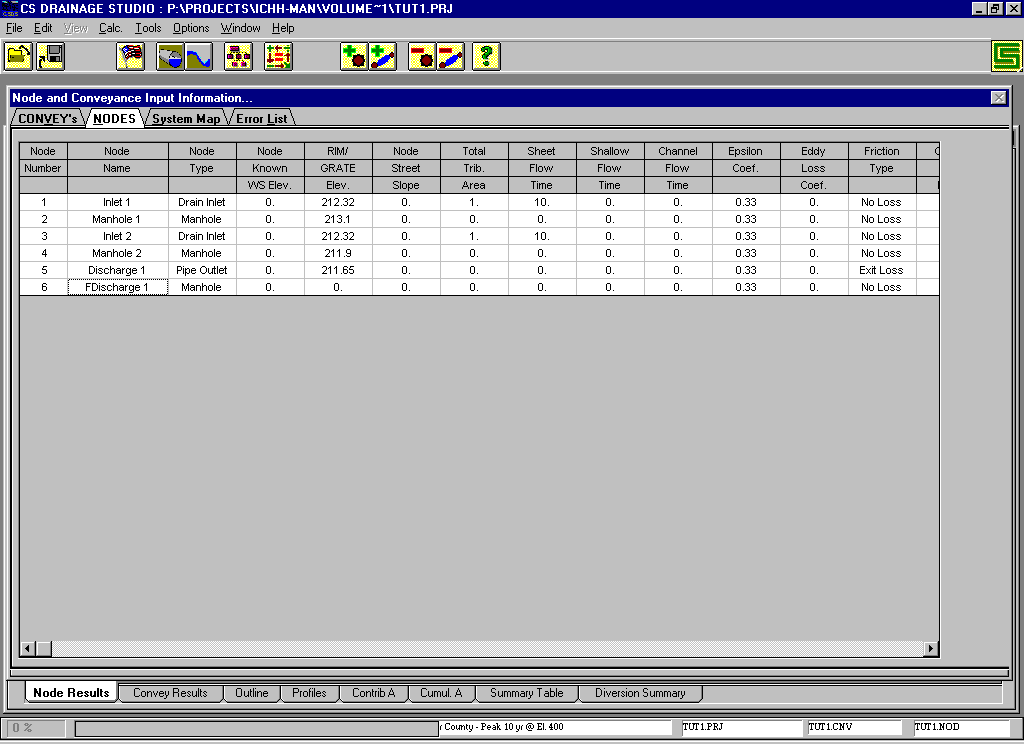
Now that all the Node and Conveyance data has been input, it is time to view the outline to verify the connections are correct, and then you will proceed to the calculations.
8. Sorting
From the Tools Menu, Click Sort. This will internally arrange the pipe connections. Clicking on the Outline tab found on the Results form, at the bottom of the screen, will display the outline of the connections.
Notice that both inlets lead to the manhole 1, which is connected to manhole 2. The flow finally leaves the system at discharge 1. This outline describes the exact situation that occurs in the street diagram. Having checked the setup, it is time to calculate the project.
9. Calculating
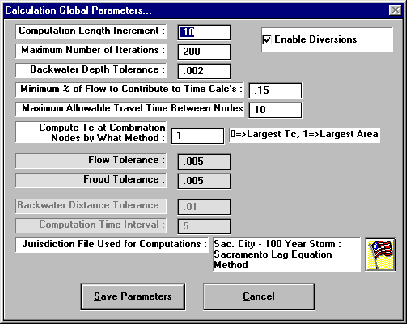
A single click on the Full Calculation (red arrows) button in the Toolbar will bring up the Calculation Parameters screen.

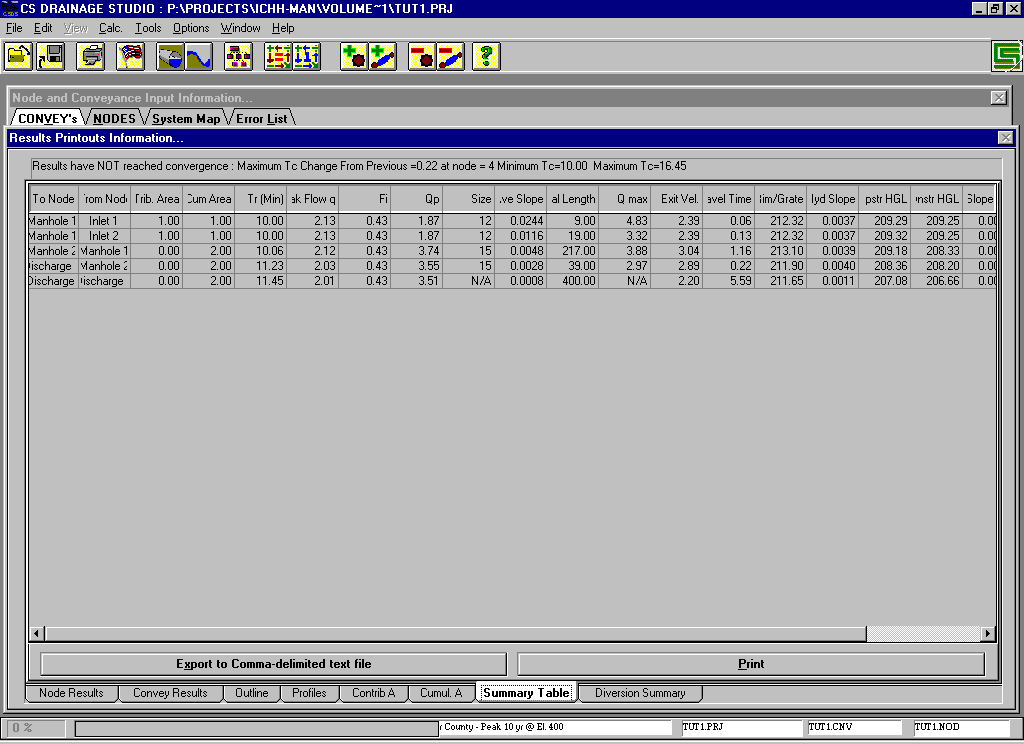
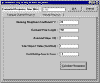
Notice that the current jurisdiction file is noted as well as Calculation Control Parameters. The values currently listed are the default settings and will be adequate for computing this tutorial, with one exception: you should disable the “Enable Diversions” setting for this computation since you haven’t defined any diversions. If you leave this setting on the program will run the calculation algorithms for diversion enabled projects which take longer to compute and require more iterations. As you become a more advance user, changing these parameters will become critical to making accurate calculations. Press the Save Parameters button to continue with the calculations.
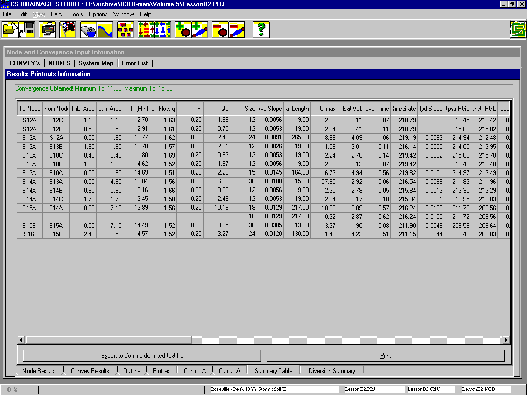
The status bar at the bottom of the screen will fill with a red bar, and then it will disappear, and the calculations are finished. Highlight the Node Results tab at the bottom of the screen and the computation results at the nodes will be displayed. At the top of the results form a box should be displayed which reads “Convergence Obtained”… indicating that the calculation do not require additional iterations.
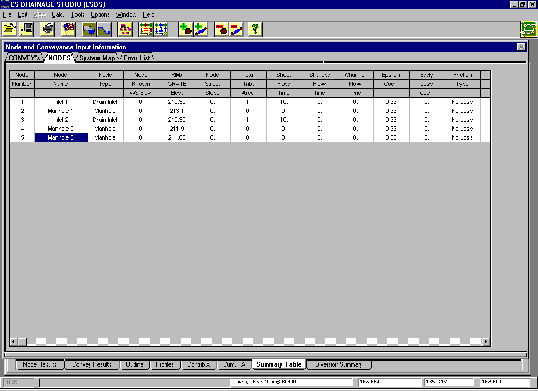
10. Summary Table
The results of the calculations can be viewed under the Summary Table tab as well. Using this view a more complete description of the computation results is displayed.
The large Print button will print out the Summary Table page. The printer button in the Toolbar and the Print option in the menu will print a report containing information from as many of the results pages as you select.
Before you finish with this tutorial, remember to save the file. From the File Menu, click Save As Project.
Type in Tut1 under File name and press OK.
The file is now saved for later use and editing. You may notice that the file names located in the status bar have also been changed to reflect the new file name.
Input 12 inches in the Conveyance Size box. The default value for ‘n’ is .015 which is the ‘n’ value designated in the tutorial diagram. To change the ‘n’ value simply click on the block and type in the new value.
Back to Top
TUTORIAL 2 - EDITING INPUTTING AND PRINTING
The second tutorial consists of a local street system which outlets into
an open channel. Inputting and running the analysis for the simple drainage
system diagrammed below will teach you the basics of inputting data. The
same methods are used for large drainage systems, and with practice you will
get much faster at inputting the data and interpreting the results.
GIVEN :
Street Diagram
DEVELOPING A PROJECT
In the street sections diagram, nodes are represented by manholes and
drainage inlet symbols and the conveyances connecting them are
represented by pipes, the same as the first tutorial. Each node is given
a set of values to be input in the program. The descriptive values for
the pipes are the length and size given in boats and above the pipe. The
value in the boat is the pipe diameter in inches, while the number above
is the length of the pipe in feet. Although each node is numbered, the
order in which you enter them into the program is irrelevant.
The objective of the second tutorial is to refresh you on inputting
data and developing a drainage system that will expel the flow away from
the street. This tutorial incorporates an open flow channel that drains
from the existing node 5 to a free discharge at node 6.
1. Open CS Drainage Studio
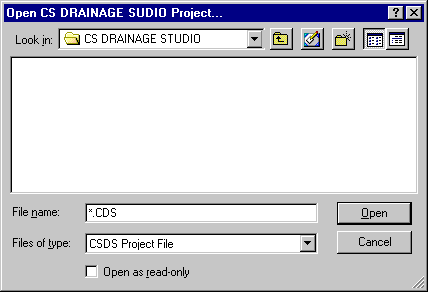
2. From
the File Menu, Click Þ Open Project
3. From the Open CS Drainage Project window,
Click Þ Tut1.cds
Adjust the spreadsheets to fit your screen or preference. These
settings should have been automatically recalled after you previously
saved the program.
Since the jurisdiction was defined for the project file Tut1, there
is no need to open the jurisdiction editor unless changes need to be
made. However, since you are new to CS Drainage, let’s change the
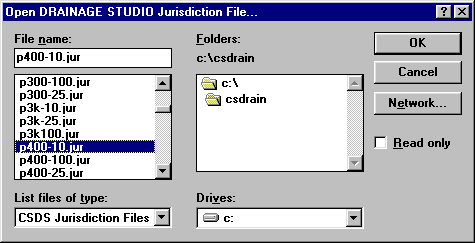
jurisdiction file to P400-10.JUR for a refresher.

First, open the
Jurisdiction File Editor either through the Edit Menu or the Flag icon.

From this window, click on the open file icon to select the desired
jurisdiction file from the list.

Click OK to close
the Jurisdiction File window, and upon returning to the File Editor,
click on the red X to save the jurisdiction P400-10.JUR as the current
setting.
The portion of open channel, attaching node five to node six, is the
major change from Tutorial 1. In order to add the channel as a
conveyance, you must change node five from a manhole to a pipe
discharge.
Double click on Manhole 3 from the Node and Conveyance Spreadsheet to
get to the Add/Edit a Node Element window.
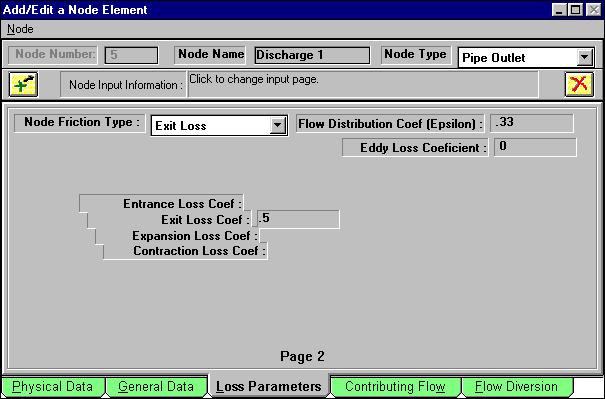
Since the node is no longer a manhole, change the name to Discharge 1
and move the Node Type to Pipe Outlet.
A pipe discharge, unlike the manhole, has an exit loss coefficient
which effectively takes into account the loss of flow energy as the flow
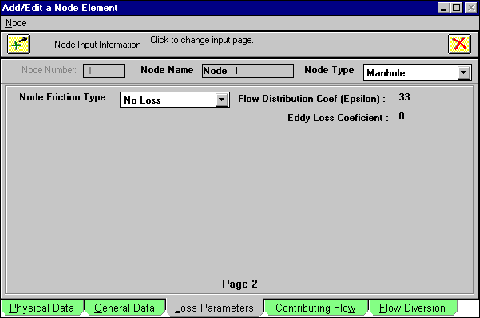
discharges from the pipe. Moving to the Loss Parameters tab,
change the node friction type to Exit Loss and follow this by changing
the 1 located in the loss coefficient bar to a .5. It should look
something like this:
Click on the green plus to save the node data.
From the diagram, an open channel conveyance connects the pipe outlet
to a free discharge node. Before you can add the new conveyance,
however, be sure to input the Free Discharge node. Input the
data, using the add/edit a node element, and name the node Fdischarge 1.
The node type should be inputted as free discharge rather than a pipe
outlet. A completed node spreadsheet will include these new additions.
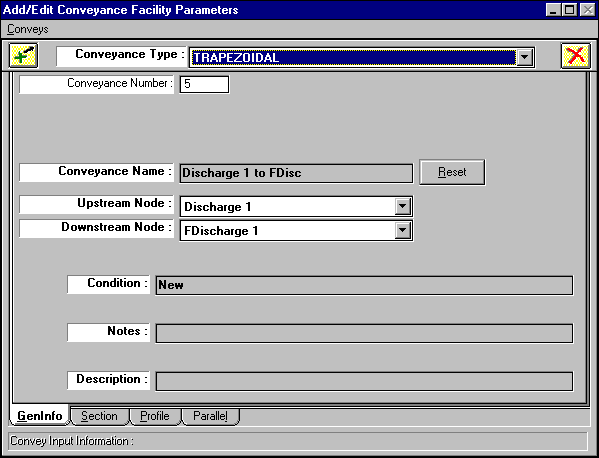
The next step is to add the appropriate conveyance under the Add/Edit
Conveyance Facility Parameter editor which can be brought up by double
clicking on the convey row.
Adjust the upstream and downstream nodes as in the window above. Then
press the Reset button to change the Conveyance name. The last
thing to input on this GenInfo tab, is the conveyance type, which should
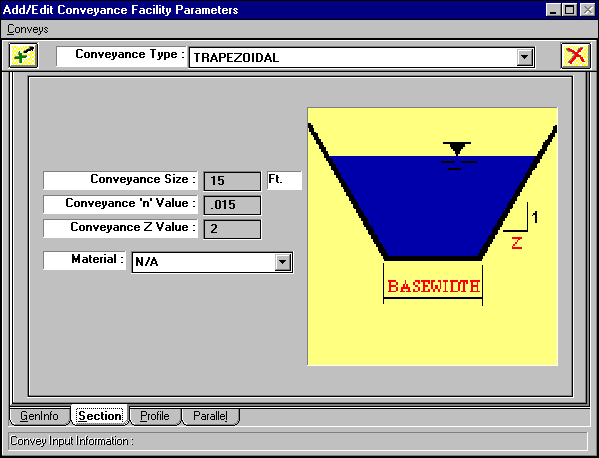
read as trapezoidal rather than the pipe default.
Move to the Section tab of the editor.
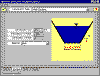
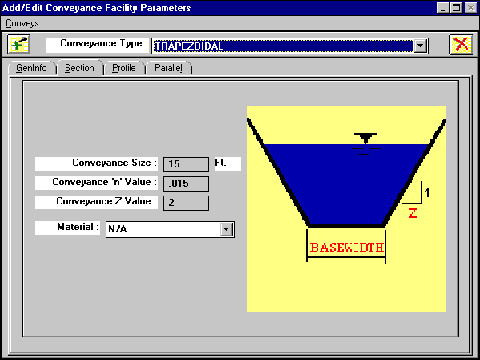
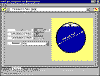
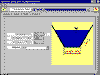
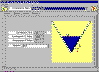
At this junction, you will need to define the parameter of the
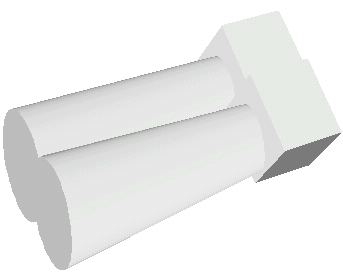
trapezoidal open channel that is being used. The Conveyance Z value is
demonstrated geometrically by the picture. The Z value corresponds to
the X-value in the slope of the sides of the channel. Keep in mind, as
shown in picture, that the Y-value of the slope is always 1. As an
example, the slope of the side could be 1.5. The corresponding Z value
that you would input is .66. According to the street diagram, the Z
value is 2.
The basewidth relates to the conveyance size. Since the conveyance is
no longer a pipe and therefore doesn’t have a diameter, the basewidth
is the number inputted for the conveyance size. After inputting 10 feet,
as directed by the street diagram, then move on to the Profile tab.
The next step is to add the appropriate conveyance under the
Add/Edit Conveyance Facility Parameter editor which can be
brought up by double clicking on the convey row.
Adjust the upstream and downstream nodes as in the window
above. Then press the Reset button to change the
Conveyance name. The last thing to input on this GenInfo tab, is
the conveyance type, which should read as trapezoidal rather
than the pipe default.
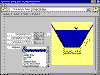
Move to the Section tab of the editor.
At this junction, you will need to define the parameter of
the trapezoidal open channel that is being used. The Conveyance
Z value is demonstrated geometrically by the picture. The Z
value corresponds to the X-value in the slope of the sides of
the channel. Keep in mind, as shown in picture, that the Y-value
of the slope is always 1. As an example, the slope of the side
could be 1.5. The corresponding Z value that you would input is
.66. According to the street diagram, the Z value is 2.
The basewidth relates to the conveyance size. Since the
conveyance is no longer a pipe and therefore doesn’t have a
diameter, the basewidth is the number inputted for the
conveyance size. After inputting 10 feet, as directed by the
street diagram, then move on to the Profile tab.
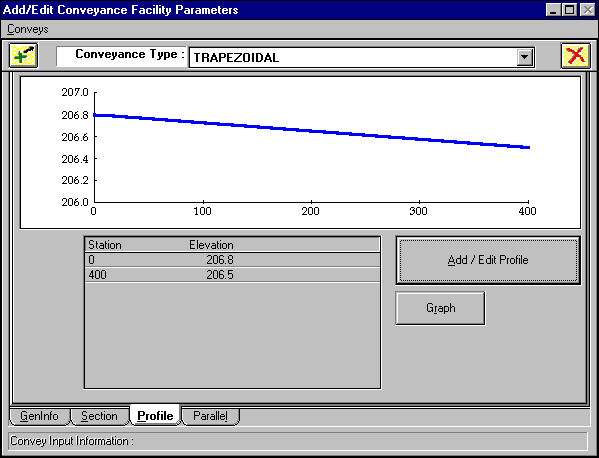
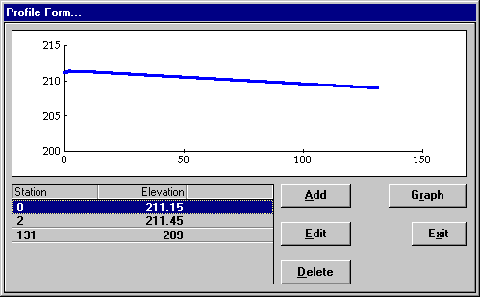
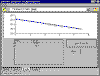
Under the Profile window, type in the flow elevations for the
two stations which are separated by 400 feet. A complete Profile
should appear like the one below:

You have now finished creating this conveyance, so press the
green plus button to save your data and return to the main
window.
The completed spreadsheet should have all five nodes with
their corresponding data.
Once all the data from the street diagram has been inputted
and your spreadsheets, both node and conveyance, match the ones
in the tutorial, press the full calculations button.
After a few seconds the calculations will cease and you can
move to the Summary Table which is located on the Results
Printout Information spreadsheet.

Feel
free to print the results of the table by pressing the Print
button.
If you would like a printed view of the calculations and
inputted data, choose the print command from the File menu of
use the print icon in the toolbar.
Go to Save As Project, located in the File Menu, and save
this project as Tut2.prj.
Having completed this, the task has been accomplished and you
may exit the program through the file menu.
CLOSE
Hopefully these first two tutorials have given you a glimpse of
the power and ease with which drainage problems can be solved using
CS Drainage Studio. The rest of the tutorials, located in Volume 5,
will continue to demonstrate more advanced features inherent in CS
Drainage. Back to Top
TUTORIAL 3 - SIMPLE TIME DEPENDANT METHODS
Basic Program Input and Calculations

Having
familiarized yourself with the CS Drainage Studio layout and completed
the first two tutorials located in Volume I, you are now ready for the
advanced topics that include parallel conveyances, diversions, and
complete 10yr. and 100yr. system analysis. These tutorials have been
designed to simulate real world design scenarios. If time is an issue,
look through the contents and pick out the tutorials that are applicable
to your projects; however, the tutorials follow a logical progression,
each building on the details of the previous. As a result, it is
strongly recommended that you read through all the tutorials to get to
the final advanced steps.
The tutorials have been laid out to take you step-by-step through the process
of inputting data, changing data, interpreting your results, and correcting any
errors that may have occurred.
Part A: Computing Inlet Response Times (Tc)
Response times are an indication of the response of the watershed to
intense precipitation at a point in your system. They are determined by
the program as the sum of the separate response times for a path
consisting of an Overland flow, and succeeding collector flows in
the form of Shallow Concentration flow and Concentrated
Channel flow.
Response times for each node can be calculated separately, through
the Contributing Flow Calculators or utilizing the Manning
Equation Solver that comes with CS Drainage. Once the values are
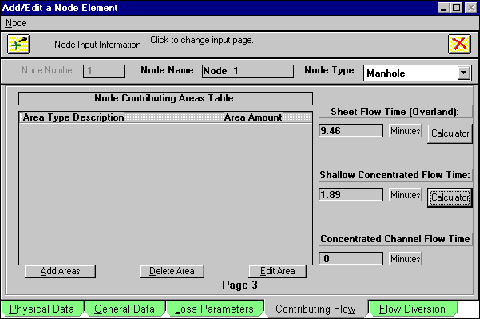
found they should be inputted in minutes in the Add/Edit a Node
Element window.
With CS Drainage program open, you can get to the Add/Edit window by double
clicking on a node name. Once this is done, the following window will appear:
In the second tutorial, the response time for Inlet 1 was given as 10 minutes
and then typed in the window under Sheet Flow Time. Had this value not been
provided the three methods mentioned earlier can be used to find an appropriate
value with the calculators or your own means. Spreadsheets are commonly used to
solve for initial response times per the local requirements. The calculator
methods in the program utilize the most common methods for solving initial
response times. Alternative methods, which generally focus on using the built-in
overland and concentrated flow calculator, will not be covered in this manual.
The Manning Equation Solver is covered in limited detail in the third volume.
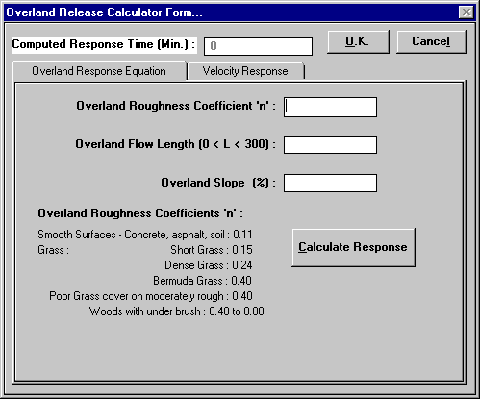
Clicking on the Calculator button under Sheet Flow Time brings up its calculator
window.
The layout is simple to use. Data is entered for Manning’s ‘n’ value in
the first block, the distance traveled by the flow in the next, and the
percent(%) slope placed in the last block. The overland roughness coefficients
correspond to estimates of Manning’s value for specific types of surfaces and
should be used if they are appropriate estimates for the study.
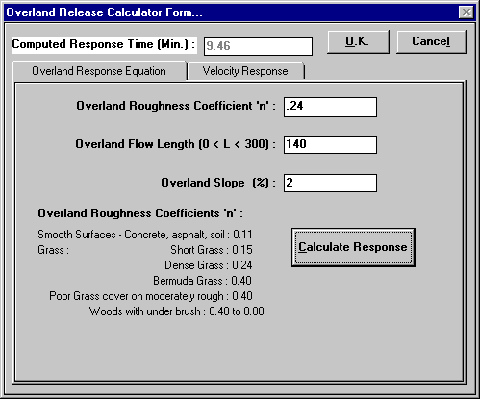
As practice using the calculator, input:
n = .24
Length = 140 ft.
Slope = 2%
After typing the data, press the Calculate Response button. Your screen should
mirror the next figure.
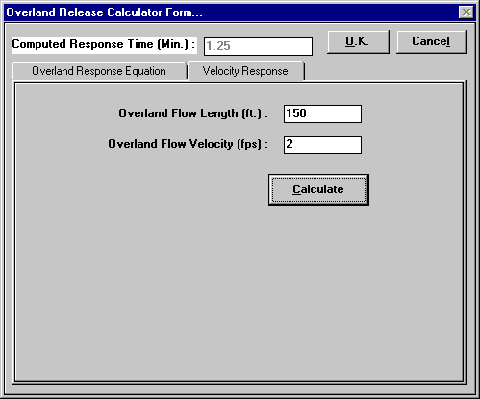
If your study dictates using a Velocity Response calculation, click on the tab
to bring up that screen.
As practice using this calculator, input (in standard English units):
Length = 150 ft.
Velocity = 2 fps
After calculating the response, your window should appear like this:
It is important to note that after the responses have been calculated the Computed
Response Time block reflects the current method. At this point, it should
read 1.25. If you were to press the OK button, this value would be listed in the
Add/Edit Node window. For the purposes of this tutorial, we want the computed
value to reflect the Overland response. Click on that tab and press the
Calculate Response button. The time, 9.46, can now be used by pressing OK.
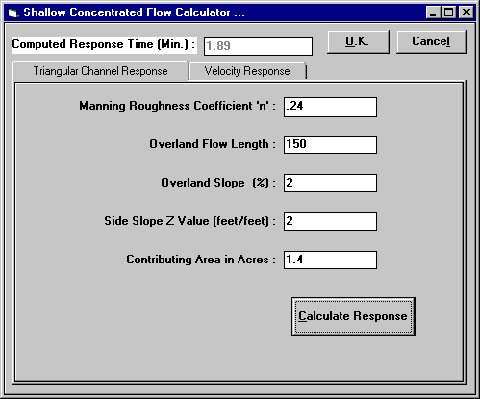
Proceed to open the Shallow Concentrated Flow Time calculator by clicking the
Calculator button under Channel Response Time.
Input the following values:
n = .24
Length = 150 ft.
Slope = 2%
Z Value = 2
Contributing Acres = 1.4 Ac
The Calculate Response button produces the required response time based on the
assumption that runoff will occur over the distance at a gradient average of 2
cfs per acre. It then computes the normal depth and corresponding channel
velocity to calculate the response time.
The Velocity Response tab is identical to the one in the Overland Release
calculator and uses the same formula. The calculated value is placed in the box
for Shallow Concentrated Flow. Exit out of this window by pressing OK. This
brings you back to the Add/Edit a Node Element window. With the sample data
calculated, your window should match.

Inlet response times are critical to obtain an accurate model of a time
dependent drainage system. When CS Drainage Studio attempts to solve the system
(see Convergence in Part C of this tutorial), it solves for true response time
values at each node based on actual computed channel velocities. The time of
concentration is the response time for the flow through the entire system to the
point of observation. As a result, it is critical to have accurate values for
each inlet response time because each upstream inlet may control the overall
system time of concentration.
Note:
As a general rule, it is beneficial to have conservative (shorter) times of
concentrations when modeling a system. This permits a margin of safety in your
design.
The program calculations will help with any drainage study, but when large
numbers of nodes are used, spreadsheet programs such as Microsoft Excel
and Corel Quattro Pro can speed up response time calculations. Designing
a layout to facilitate calculations for your study is an option that would be
helpful for Lesson 4 and your own large projects. The program allows you to
specify response times in any of the three time input boxes. The software then
adds the boxes to solve for the inlet response time.
Part B Modifying Calculation Parameters
1 With CS Drainage open, from the File Menu, click Open Project
2 Look for and open Tut2.prj
(If you did not create the project for tutorial 2, refer to Chapter 4 in Volume
I for the system input)
3 From the Main Window, you can check to make sure the jurisdiction file is
P400-10, as set up in the latter steps of tutorial 2. The current jurisdiction
file is presented at the bottom of the window as seen in the figure below.
The full name of the file is given. If there is uncertainty regarding the file
name, click on the flag icon to open the Jurisdiction File Editor.
The Jurisdiction Title indicates the .jur file that was selected.
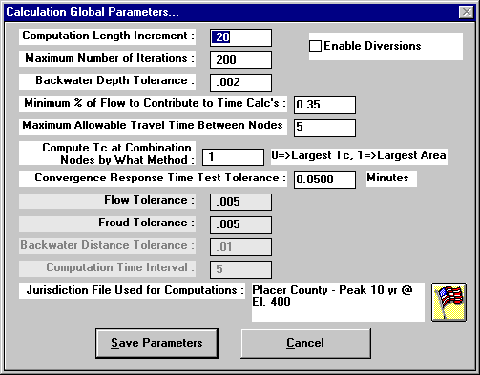
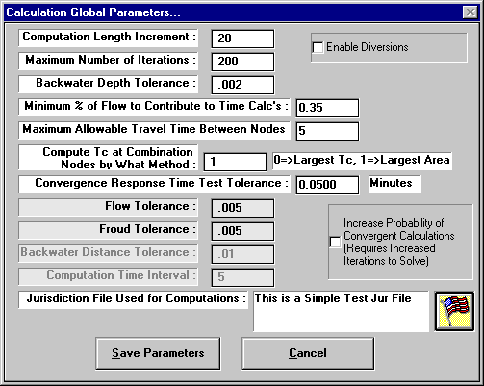
Calculation Parameters
The calculation parameter screen helps you to organize and develop the method in
which your study will be calculated. The Calculation Global Parameters screen
appears when the user clicks on Calculation Parameter from the Calc menu or any
time a full calculation is performed.
(See Getting Started, Volume 1, for more information on full calculations.)

Definitions of Input Requirements

The horizontal length through which the standard step gradually varied flow
calculations are performed. If spiking or inaccuracies appear in your
calculations this option may have to be increased (to avoid tolerance
inaccuracies) or decreased (to reduce the probability of spiking.
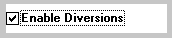
By clicking on Enable Diversions, bypass and sag information will be computed
during the calculation process. If the box is not checked, then the bypass and
sag diversion will not be part of the final calculations. The diversions will be
covered in more detail in Lesson 3.

The maximum number of times you want to limit the software to attempt to solve
for anything requiring an iterative solution. In most cases this value should be
left in the range of 50 and 200. If you receive warnings on the Error List that
the maximum number has been reached then you may have to increase this value or
increase the Backwater Depth Tolerance.

The tolerance used in iterative solutions where solved depths are compared with
estimates. Instances occur where the solutions cannot be iterated to the
tolerance specified which will generate a warning on the Error List. The larger
this tolerance value, the greater the probability of error in the results.
Reasonable inputs vary from 0.002 to 0.005 feet.

For hydrology methods where response times are used to compute peak runoff
rates, and where parallel flow paths are used (such as street flow and pipe
flow), this variable is used to determine the minimum percentage of flow that
must be passed at a path for the path to contribute to the weighted response
time of the combined conveyances.

This variable is used to limit the amount of travel time computed between any
two nodes to a maximum amount. This variable should be set at the maximum
reasonable value that produces convergent calculation results. (generally
between 5 minutes and 20 minutes). The program uses the computed weighted
response times unless they are greater than this value, in which case the
maximum allowable time will be used for the time through the conveyance.

Two alternative methods of estimating the response time that is used downstream
of a combination node are available. "0" will compute based on the
largest Tc of the upstream reaches. "1" will compute based on the
largest contributing area of the upstream reaches. Method "0" has in
the past been the common way of performing the computations. Method
"1" however, has been shown to produce a result which envelopes more
of the potential runoff events for many hydrologic methods.

This variable is used to determine if the changes in response times at nodes
from one iteration to the next are satisfactory to declare convergence. The
variable is reported in minutes. Values between 0.005 (0.3 seconds) and 0.05 (3
seconds) will provide highly accurate results. You should not change this
variable from project to project. You should set a value you are comfortable
with and use the other factors to force convergence.

Until a Jurisdiction file has been chosen, the default setting, This is a Simple
Test Jur File, will appear. Be sure to change these parameters by clicking on
the flag button and acquire the appropriate file for your study.

Flow Tolerance & Froud Tolerance are not significantly used in this software

Backwater Distance Tolerance and Computation Time Interval are not used by this
software, and are reserved for the hydrograph versions of the software.
Note:
The software will divide each conveyance into sections of equal length for the
Computational Increment in order to compute flow profiles. In the event of a
remainder length, or a profile increment length less than the computational
increment occurs, the smaller value is used. For English units, computational
increments between 10 and 50 feet provide the most accurate results for typical
land development type drainage systems. Having too many increments can cause
inaccuracies to occur due to the allowable tolerances for the iterative
solutions. Having too large a value for the Computational Increment can also
cause curve approximation accuracy problems.
Changing Inputs
Important concepts to remember regarding the Global Parameters are their roles
in helping the system to converge (although simple pipe and open channel systems
will often converge without any special settings). The parameters are the
convergence control variables. The software integrates the use of the parameters
to force the system to be convergent. Those parameters, however, need to be
adjusted for each system to meet jurisdiction requirements and to provide
precise results. The purpose of this section is to present you with the various
changes that can be made and the effects they will have on convergence.
Jurisdiction Requirements
Each jurisdiction has guidelines to be followed when modeling a system. Please
refer to each agencies standards to obtain those requirements.
CS Drainage Studio integrates calculation methods for a variety of agencies and
are detailed under Jurisdiction Signature Files.
Enable Diversions permits the use of bypass and sag information during
the calculations and generally will increase the time and difficulty in getting
the system to converge. This topic will be developed in Lesson C: “Simple
Diversions”.
When systems are difficult to converge, check the box Increase Probability of
Convergent Calculations. This will improve the chances of solving the
system but will require an increase in the number of iterations to reach
convergence.

Changing the other parameters in the window may help with convergence or may
make it more difficult. Take a systematic approach when changing these values
rather than a trial and error method. You will learn which values have more
effect and develop a better understanding of the parameters with a systematic
approach. This approach is discussed in the next section where you will use a
previous project to observe convergence and the effects that parameters have on
a calculated system.
Part C Convergence
Obtaining Convergence
Open the file Tut2.prj if it is not already open. This file is a simple mock-up
of a street layout that will demonstrate the use of convergence.
The mathematical structure of CS Drainage Studio is based on an iterative
approach, much like Newton’s method of shrinking the boundaries above and
below the value until the system converges on the final value.
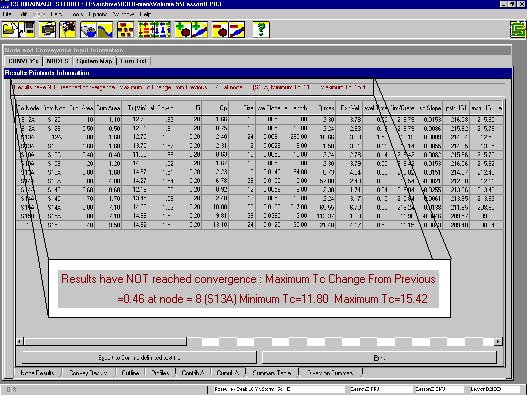
Encountering Solutions
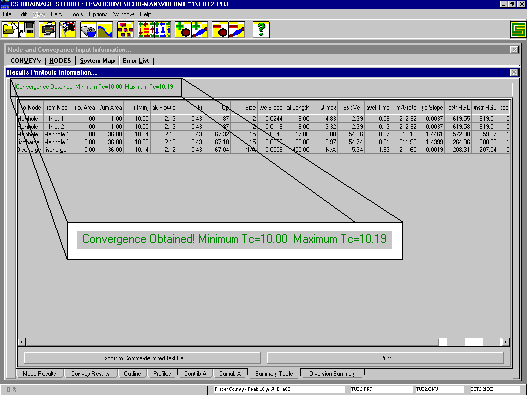
At the top of the results form, a message is displayed following every
calculation event that indicates whether convergence has been obtained.
If the calculation yields a convergent solution, then the message will say Convergence
Obtained! in green lettering and gives the minimum and maximum time of
concentration values.

The alternative message will give the message Results have NOT reached
convergence in red letters.

A non-convergent solution will continue to report different results for time of
concentration (Tc) each time the single iteration procedure is performed. Often
only one or two nodes will change between iterations, however, the changes can
be significant.
The Non-Convergent effect is typical to:
1 Open channels with significant changes in surface area through minor changes
in hydraulic depth near the expected flow depth (i.e. streets and channels with
over bank areas).
2 Parallel flow systems with one conveyance significantly lower than the other.
3 Hydrologic methods in which the flows are based significantly on the response
time.
Note:
If you find a system is non-convergent, it doesn't mean that the design is
unstable or that mother nature can't figure out how flows should occur in your
system. It simply means that based on the current set of parameters you have
supplied the software, more than one solution has been calculated, and you
should provide more guidance to the software. The software uses standard
hydraulic solutions. They aren't a perfect model of the hydraulic universe.
Many of the hydraulic and hydrologic combinations available in this software can
result in Non-Convergent solutions (i.e. the software could continue to iterate
endlessly, reporting different answers after every iteration). This is why in CS
Drainage Studio you have control over the number of iterations to be performed,
and the Calculation Parameters. The math behind why this tends to occur is very
complicated but advanced explanations are detailed in Volume 3. The Global
Parameters can be adjusted to find convergence; however this may require that
overly conservative assumptions be used. Civil Solutions continuously upgrades
the software to make more accurate and complete computations which will allow
easier convergence.
In non-convergent solutions the calculation tolerances must be adjusted to
provide the 'best' possible convergent solution. For simple systems that do not
include complicated parallel open channel flows, extremely accurate results can
be obtained. For more complicated systems the 'Maximum Time through any
Conveyance' variable should be adjusted to provide the best possible solution.
*Advanced Explanation of why some systems are Non-Convergent:
Some open channels will have very small velocities which will adjust the
weighted average response time through the conveyance to a very large value(
>20 minutes), however, this may not provide a convergent solution since in
the next iteration all systems downstream will compute flows based on a much
larger response time, resulting in lower flows and a lower HGL/EGL at the
observed conveyance. This lower HGL/EGL will result in less of the flow being
passed through the open channel or parallel facility, therefore, reducing the
weighted average time through the conveyance in the following iteration. This
results in higher flow downstream of this facility on the next iteration, and
thus the calculations continue to flip flop. A non-convergent solution occurs
even though the software is performing accurate calculations of the
system.
Changing Parameters
If you notice a flip-flop occurring (also referred to as ‘bouncing’), reduce
the Calculation Parameter Maximum Time through any Conveyance to a smaller
value. For subdivision type systems a value of approximately 10 minutes usually
forces convergence, but sometimes this needs to be reduced to a value as low as
5 minutes or less. The best result is the one that calculates to convergence and
has the largest value for this variable.
Note:
Under estimating this variable will result in an over estimation of downstream
flows and therefore, upstream HGL/EGLs may be computed high.
The flip-flop can occur on simple single flow path systems with any type of
conveyance facility as well, but will generally be noticeable on systems with
open channels of complex shape, and most noticeable on systems with a parallel
complex open channel (e.g. pipe underground system with open channel
representation of street flows above). Civil Solutions has made many advances
which will make computations in version 2.20 and beyond significantly improved
for convergence.
Integrating Convergence with a System
1 Look for and open Tut2.prj
2 Press the Full Calculation button and click on Save Parameters to perform
calculations.
With the simple layout of the system, you should easily obtain a convergent
solution with the default Global Parameters. Move to any tab on the Results
Printouts Information spreadsheet and look for the convergence information.
Non-Convergent Example
The system that was computed converged in one calculation. This is due to the
small size of the system, only 6 nodes, and its lack of advanced features. In
order to demonstrate a non-convergent example, you need to change a few numbers
in the system.
1. Open Add/Edit Conveyance Facility Parameters for conveyance 4.
2. Under the Section tab, change the conveyance type from Pipe to Triangular.
Note:
These values are arbitrary to demonstrate a non-convergent solution and should
not be construed as a proper method of system optimization.
3. Save the values and return to the main window. Your screen should appear like
the one below.
After successfully inputting the data, return to the Summary Table tab. Once
again, press the red Full Calculation button and click on Save Parameters to
begin the convergence calculations.
The first thing you may notice is the red lettering above the table, indicating
that the system has not converged.
With this calculation, the CS Drainage has found a change in the time of
concentration between incremental steps at the specified node (node 5/ Discharge
1 in the above calculation). In addition to presenting this information, it also
presents the Tc minimum and maximum values for the entire system.
Since the system has not converged, the numbers given for Tc as well as the
summary table information cannot be fully trusted.
There are three different tasks to perform when the system has not converged.
The first is to perform multiple iterations by repeatedly pressing the blue Calculation
button to obtain convergence. The second method is to change the Global
Parameters. The last way is to check the system profiles around the node that
are not converging to look for “spikes” that would indicate faulty node or
conveyance information, or a need to modify your system.
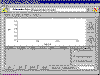
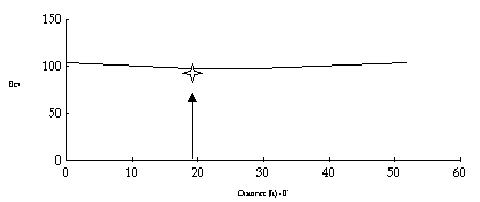
In the Tut2 system, move to the Profiles tab.
With the Profiles tab you can manipulate the profile views of the
conveyances and look for peaks or jumps that would show where the difficulty
with non-convergence is located. The table beneath the graph gives Invert, Top
of Pipe (pipe rim), Y-crit, HGL, EGL, and Type of Calculation information at
designated distance intervals. The legend to the right of the graph shows the
respective lines that are attributed to those pieces of data.
Operate the profile by choosing an upstream node and a downstream node from the
pull-down menus. A good rule of thumb is to start with the far ends of the
system chosen and move in on the area of interest.

If you want to record your profile you can print the graph, the table data or
export the data to a tab-delimited text file using the appropriate buttons. Each
time that you specify your upstream and downstream nodes the Re-generate
Graph button must be pressed.

Profiles are a handy tool to diagnose non-convergence. It is up to you to decide
whether to adapt Global Parameters modifications or to change certain aspects of
the pipe system. Back to Top
TUTORIAL 4 - CULVERTS
Part A: Inlet and Outlet Losses for PipesThe flow of the water changes with adaptations to pipe systems. The turbulent
flow of water is affected by turns and transitions through nodes. These effects
can often be modeled through losses due to friction. CS Drainage Studio
effectively utilizes losses to provide system analysis.
Node losses are taken into account through the Loss Parameters tab located in
the Add/Edit a Node Element window.
 The default setting is for a “No Loss” manhole. This can manually be
adjusted by clicking on the Node Friction Type and selecting an appropriate type
of loss. As an example, choose Exit Loss to demonstrate the programs
features.
Once an Exit Loss has been selected, you will notice that loss
coefficients appear underneath the friction type. The current value is 1, but by
clicking on that space, you can type in any value according to your needs.
In addition to the four loss coefficients visible in the previous screen, a Constant
Loss value can also be chosen.
The loss is split into a constant head loss entering a conveyance and a constant
head loss exiting a conveyance. The differences between the different types of
losses are described more intricately in the Volume 3 details manual where you
learn how to apply specific losses to the system. All the loss coefficient
fields in the window can be manipulated to suit your individual needs.
Specific Node Types automatically attribute losses due to the nature of the
node. For example, selecting a pipe discharge will bring up a contraction loss.
The setting of losses demonstrates the need for a contraction loss, which can be
changed if the value is not appropriate.
Part B: Simple Open Channel Types
In the analysis of real systems different channels, other than pipes, are
used to transport storm water. CS Drainage makes use of the variety of methods
through conveyance selection.
Bring up the Add/Edit Conveyance Facility Parameters screen and scroll
down the Conveyance Type menu to view all the different types available. The
program offers the solutions to four types of open channels and two types of
closed conduits (Pipes and Topped Open Channels). The three types simplest to
use and explain are Rectangular, Trapezoidal, and Triangular.
The Section tab shows a cross-section of the chosen conveyance type.
For this example, click on trapezoidal conveyance type and take a moment to view
the section screen. The conveyance size, formerly the diameter of the pipe, now
represents the base width. The ‘n’ value still is Manning’s n-value for
the channel while the Z value determines the slope with regard to a one
increment rise as shown by the figure.
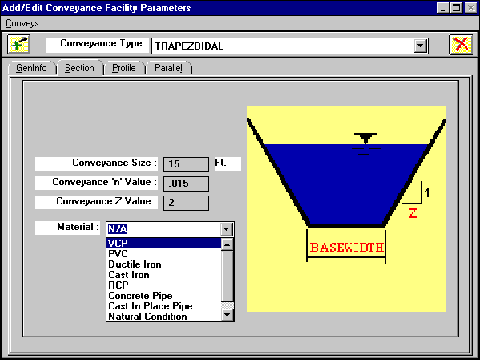
In addition to these conveyance descriptors, the type of material for the
channel can be selected with the Material scroll window (This value is not used
in the program but will show up in the results reports).
The other simple conveyances, Rectangular and Triangular are based on the same
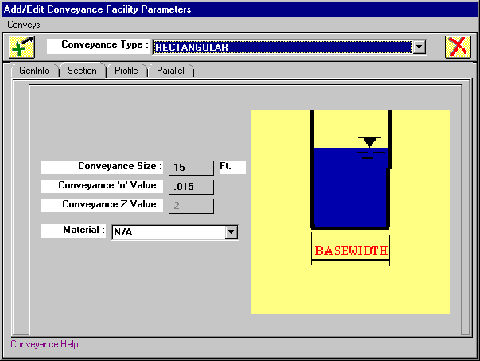
properties.
The rectangular conveyance works much like the trapezoidal but has defined
vertical sides. The size, ‘n’ value, and material information requires user
input but the Z value is not selectable since the sides are vertical. The faded
‘2’ seen in the figure will have no effect on the calculations.
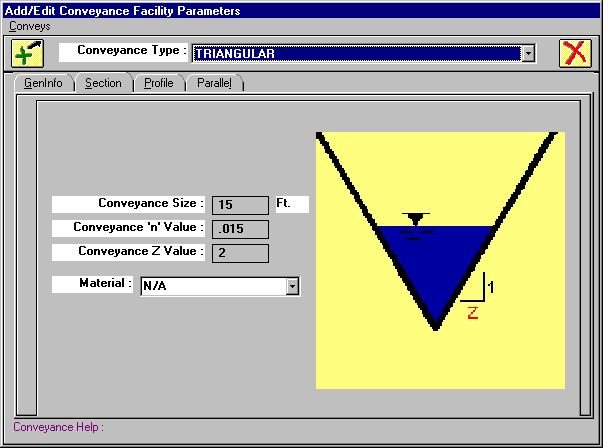
Triangular conveyances are based on a V-shape and use all the input features
except size.
Part C: Advanced Channels
The difference between the basic channels previously discussed and advanced
channels is the ability to customize the channels to advanced shapes. CS
Drainage Studio comes with a select number of pre-defined advanced channels but
it is up to the user to adapt, change, and create culverts that are appropriate
to their design constraints.
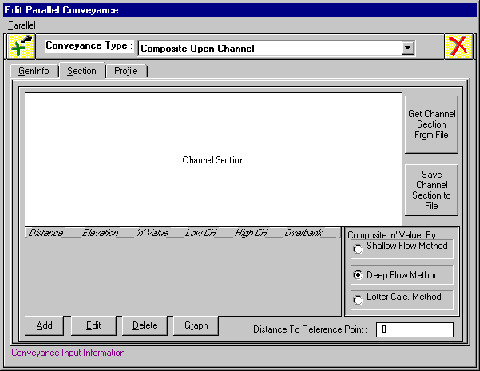
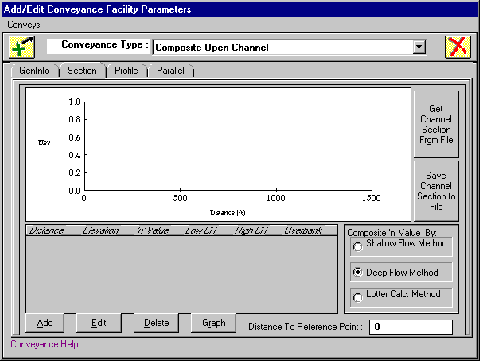
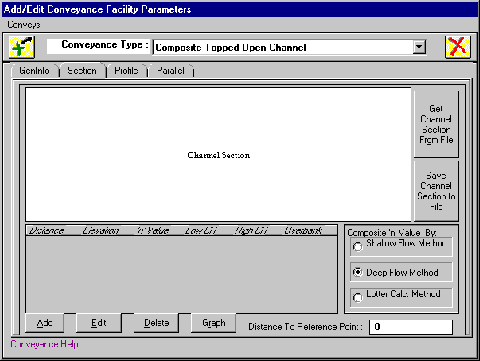
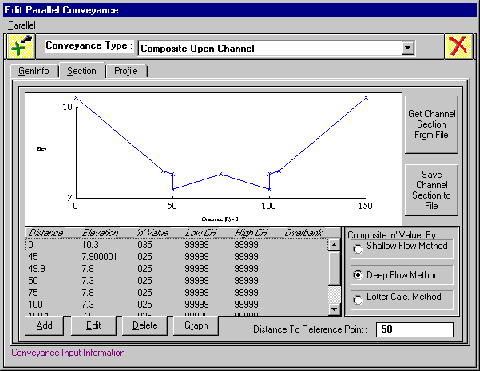
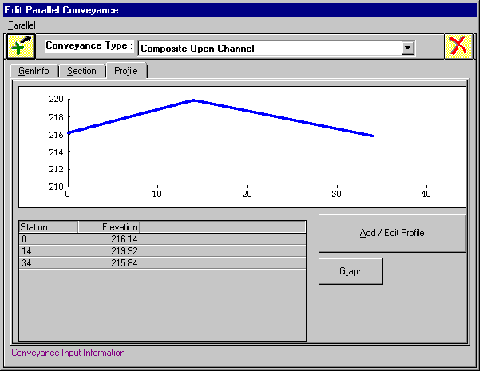
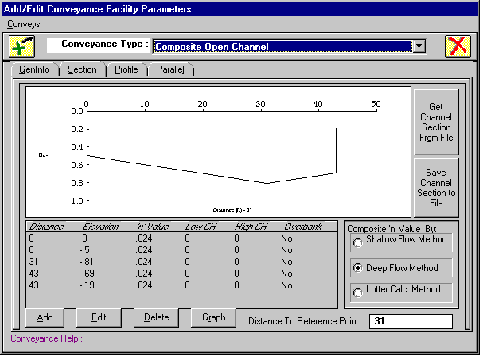
Composite Open Channels
Similar to previously covered channels, advanced channels base their design on a
cross-section schematic. Open the Add/Edit a Conveyance Facility Parameter
window and click on Conveyance Type choosing Composite Open
Channel.
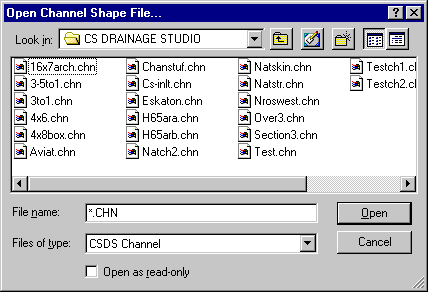
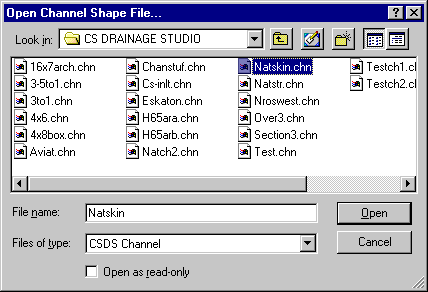
The pre-designed types can be accessed after pressing the Get Channel Section
from File button. The button will bring up a small explorer window that contains
the folder CS DRAINAGE STUDIO under Program Files on your hard drive. Double
click on Eskaton.chn.

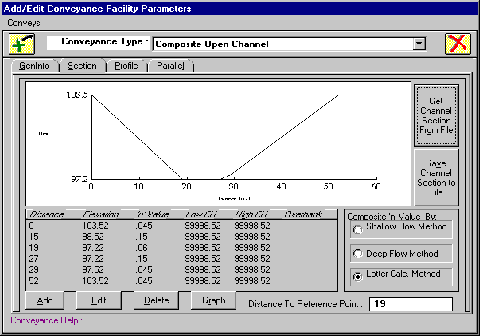
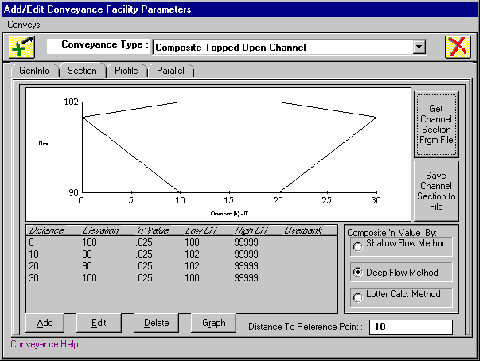
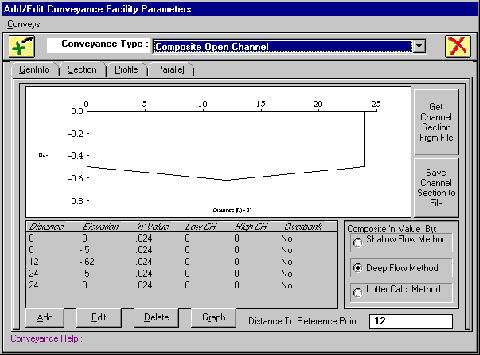
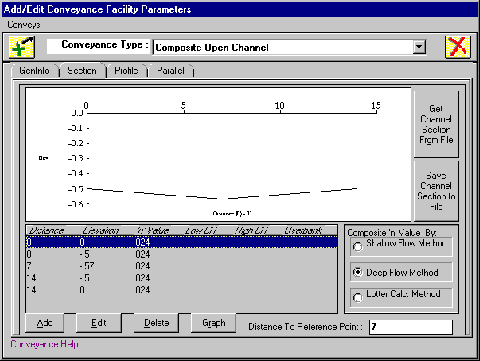
The section profile window will reappear with a diagram of Eskaton.chn and the
accompanying data points in the table below.

As viewed in a 3-dimensional rendering, the conveyance would appear as an
approximate trapezoidal channel.

If this model fit your needs then you could move to the Profile tab and finish
the conveyance. If this channel shape is close to what is needed, then you can
edit the values in the table by highlighting the point to be changed and
pressing the Edit button.

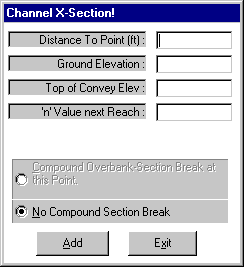
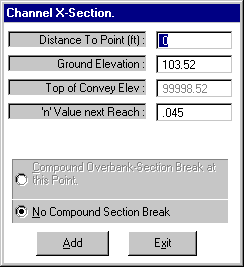
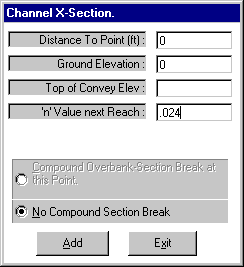
The three boxes that you can manipulate are Distance to Point, Ground Elevation,
and ‘n’ Value next Reach. The other boxes are references for the program and
cannot be changed.
In there is a need to create an original conveyance cross-section then the same
procedure would be used. Leave the screen empty (do not get a channel file) and
click on the Add button. The same screen, Channel X-Section, as the edit window
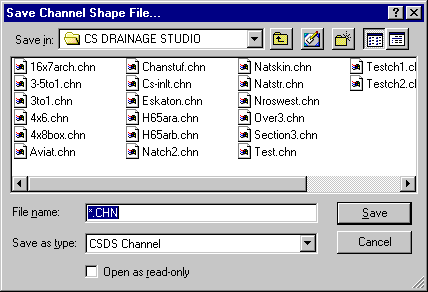
will appear with all input boxes blank. Add as many points as necessary and then
save your channel by pressing the Save Channel Section to File button.
Once the cross-section of the conveyance has been defined then proceed as you
did with the box culvert.
Take another look at the main editing window for composite conveyances.

A key box to note is the Distance to Reference Point in the lower right corner.
The value displayed marks the point where the conveyance will be inserted into
an actual landscape. The first station in your profile, the origin of the
conveyance is at a specified height. That specified height is where the
reference point will be placed. On the previous example, the reference point for
Eskaton.chn is at 19 (The lowest invert in the channel is used on channels
opened from a file).
When more than one 'n' value is used in a composite or compound channel section
a composite 'n' value must be solved for. This program offers three methods for
the computation of composite 'n' values.
In compound channel sections, composite 'n' values are used to solve for
critical depth, and to solve for composite 'n' values in over bank sections with
more than one 'n' value specified.
*Explanation of Composite ‘n’ Value:
Shallow Flow Method
Based on the assumption that the total force resisting the flow is
equal to the sum of the forces resisting the flow developed in the
subdivided areas.
Deep Flow Method
Based on the assumption that each part of the area has the same
mean velocity.
Lotter Calculation Method
Based on the assumption that the total flow is equal to the sum of
the flows within the individual sections.
The default setting is deep flow which may be changed according to your specific
needs.
Composite Topped Channel
Organized using a similar window to the untopped channel, topped channel differ
only by their cover. These channels can have a complex shape with a top equally
as complex. Open channel flow, pressure flow and partial pressure flow can all
occur in these channels. The Add and Edit functions work the same as well as the Distance to Reference Point and
Composite ‘n’ Value methods.
Open Test.chn as an example of a topped channel (by clicking Get Channel Section
From File button).
Closing Comments
Response times are the most important ingredient with regards to accurately
developing a system. They contribute to the flow of water that ultimately will
determine convergence.
Advanced channels are more likely to cause convergence problems in modeling
systems that don’t fit a standard conveyance. However, analysis of these
systems is crucial in the operation of this software on your projects. This item
will also be discussed in Parallel Conveyances which are covered in
Lesson B.
Back to Top
TUTORIAL 5 - PARALLEL CONVEYANCES
One of the
advantages that CS Drainage Studio has over other hydraulic and
hydrology software programs is the ability to analyze and balance
parallel conveyances. The program can deftly calculate complicated
systems with an unlimited number of pipes, overland releases and more.
In addition, the program is user friendly, making your job easy. Input
is straight forward and modeling is flexible to fit the needs of the
most demanding developments.
The Parallel Conveyance Tutorials have been constructed with emphasis
on three important facets that include multiple and dual culverts,
overland release at street level, and overland release for parking
areas.
Part A: Multiple Pipe Culverts (30 Minutes)

Sample System Revisited
The sample system presented on the previous page is an extension of the system that you had been working with in Tutorials 1 and 2. Notice the similarities in the layout of the pipes, but also be aware that the overall system has taken on the appearance of a development. The ultimate goal of CS Drainage Studio is to be able to analyze complex drainage systems.
This plan will appear in some form throughout the next three lessons. Each topic will build a new aspect into CS Drainage, with this lesson concentrating on Parallel Conveyances.
There are three main instances when parallel conveyances occur. The first is when runoff requires the use of two side-by-side pipes, known as multiple pipe culverts. The second instance is for overland release using street conveyances for a large storm event. The last is for a large storm event analysis for parking areas.
Multiple Pipe Culverts
The need for side by side pipes exists when either larger pipes create extreme expenses or when a pipe must be downsized because of existing constraints in depth and cover.
The premise of the program is able to connect a node to another with a single conveyance. A single node can connect to an unlimited number of upstream connections but that node can have only one downstream conveyance.
An easy way to understand the idea is to look at the program itself. When the Add/Edit a Conveyance Facility Parameter window is open observe that under the GenInfo tab, only one connection is made between the upstream node and a downstream node. Do not assume that a double pipe can be inputted by adding another conveyance with the same upstream and downstream node identifiers. This will generate an error! As an example, if you were to add two identical pipes to your system and attempted to organize your system you would get errors similar to the following:
The next error message is given when a system with two identical conveyances is attempting to be calculated. Note that it references the Error List tab which gives the same error message as when the organize command was used.

In addition to giving errors, the program will simply not work with two identical conveyances. The way around this is to use the parallel conveyance features to define these additional conveyances.
With only one connection or pipe between the two nodes, multiple culverts must be defined under Parallel Conveyances.
Inputting the System
In order to appreciate parallel conveyances, start this tutorial by inputting all the system data depicted on the Lesson B System. The jurisdiction file to be used is Roseville Peak 10-year storm: Soil D, found under the file
“ROSEV10.jur.
System Information:
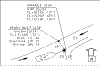
Proposed drain inlets are depicted by a solid square with a “drain inlet” call-out. Next to the callout is the node name. These names were arbitrarily given with the ‘S’ representing System. It is suggested that you use the same node names as given since all referenced figures to the tutorial will involve these particular node names. In your own endeavors, feel free to develop a pattern that is comfortable when naming the nodes because the printouts from CS Drainage Studio will refer to the node names. Identification is crucial to organizing and presenting the data received from CS Drainage Studio. Underneath the node name is the grate elevation that is input as RIM/GRATE Elev. in the General Data tab under Add/Edit a Node Element
(for review see tutorial 1). The next information is the
flow line (FL) used in the Conveyance Profiles. The next three entries are contributing area, overland release distance, and shallow channelized response distance respectively. These entries need to be inputted in the appropriate places in the Contributing Flow tab under Add/Edit a Node Element window. The manhole call-out has values for the Rim elevation and the various flow lines
attributed to the entrance or exit of a specified pipe. The specified pipe will be denoted by the diameter of the pipe and on occasion, the direction from which the pipe emerges. Corresponding pipes can be seen by the diameter boats that appear above the pipe. In the example, a 24” diameter pipe is entering the manhole from the West. Boats do not always appear. If this is the case, then the pipe is a standard 12” diameter pipe as described in the legend of the entire system. Pipe lengths are given in linear feet (LF) and are printed next to the pipes. The arrows with a numerical percentage, 2% for example, denote the slope of the street and is utilized when entering shallow concentrated channel calculations for response times. Please refer to Tutorial 3 (Lesson A) if you need a refresher on using the Overland and Channel Response Time Calculators. Manning ‘n’ values are provided for the overland and channelized (or shallow) portions are also provided in the lower left corner of the
Lesson B system.
When finished inputting the system, your CSDS Node window should contain 14 nodes and 13 conveyances.
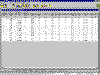
 After completing the input portion, calculate the results. The first time after calculation, the results convergence information window will state that convergence has not been reached.

Press the blue re-calculation button once more to obtain convergence. Convergence is not the perfect solution to a system. It simply means that your system is connected properly and the flows could be mathematically simulated within the tolerances you specified. For more information on interpreting the data and optimizing your system, look to Lesson D.
Save this project as LessonB.prj on your hard drive.
Adding a Second Pipe
The concentration of this lesson is multiple culverts and as such, assume that the system needs to have a parallel pipe connection from node S14A to S14B. They both need to be constricted so that each diameter is only 18” due to an imaginary depth conflict with an existing water line.
Parallel conveyances may sound different and somewhat difficult, but inputting them is as simple as the main conveyance paths. Start by returning to the conveyance where the parallel is to be placed. For this example, go to the Convey Name, S14A to S15A. At the Add/Edit a Conveyance Facility Parameter window, move to the Parallel tab.
The four button at the bottom of the window access the parallel conveyance tools. Click on Add To List to add a new parallel to your list. Or if you already have parallels at this conveyance, you could highlight an existing parallel and press Edit Selected to edit your parallel conveyance or Delete Selected to remove the conveyance from the list of parallel conveyances.
*Caution:
The delete function can only be undone by exiting out of the window with the red ‘X’ cancel button. Remember that this procedure also cancels all other data entry that may have occurred in the editing of the current conveyance.
Click on Add To List
This will bring up a window that appears the same as the normal conveyance. Set to the Section tab. In order to distinguish where you are, look to the upper left corner where the words Edit Parallel Conveyance are printed.
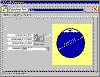
As per specifications, change the Conveyance Size to 18 inches. Moving to the GenInfo tab, you will notice that none of the info can be changed except for the Notes at the bottom.
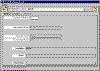
The Gen Info window show the upstream and downstream node connections and acts as a reminder of the conveyance that you are editing.
The next step is to change the Profile.
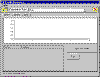 The two 18” pipes are going to be side-by side which means that they both will have the same
flow line elevations at the upstream and downstream ends.
Input the same data as you did for the original pipe profile for the conveyance from S14A to S15A. When the profile is complete, save your data and return to the main Add/Edit a Conveyance window. Notice that you have now created 1 pipe parallel conveyance from S14A to S15A as written in the Parallel Conveyance List.
Before exiting out of the conveyance, be sure to change the pipe diameter of the current pipe from 36 to 18 inches.
Note:
Two 18” diameter pipes with equivalent ‘n’ values are NOT hydraulically equivalent to a single 36” diameter pipe with similar properties.
Once back at the main window, perform a full calculation. Click on the Summary Table tab and observe the conveyance that you just changed. The system is not converged, so iterate your calculations until convergence has been reached.
 There are now two lines designated for S15A downstream and S14A upstream nodes on the “Summary Table” page of the results. The first line contains the computed results for the main conveyance path such as contributing area, response time, and flow generated by those values. Starting at size, both lines take on values for each specific pipe. The main pipe is the top line while the parallel pipe is the second line.
Convergence Information:

Original and Parallel Pipe Information (Respectively):

Some computed results may differ by small amounts between the original and the parallel pipe. This is a result of the computational tolerances defined. Since these pipes are parallel, not identical, the differences are within acceptable ranges.
Save this project to the file LessonB2.prj, to differentiate from the previous project with only one 36” pipe.
Having completed the multiple culvert example, the next step is to integrate the basics of parallel conveyances in the analysis of large storm events and understand applying what you have learned to Overland Release.
Part B: Overland Release, Street Conveyance (30 Minutes)
Analysis of drainage systems for large storm events will likely show that flow cannot be completely contained within your pipe system design. The most practical and accurate way to model this potential is with parallel conveyances at the street level.
Continue with LessonB2.jur and refer to the Lesson B system diagram. Dealing with the flow of water at street level requires modeling the path that the water would follow. This requires your engineering
judgment to determine courses of run-off which will be modeled parallel to your underground systems.
Profile View:
The water flows from the high point to the low point making flow modeling intuitive. However, the street flow must reflect the water that is also coming out of the drainage system from upstream in addition to that present in the street. CS Drainage Studio manages to adapt the two by mirroring street flow as a parallel conveyance.
Example Flow:
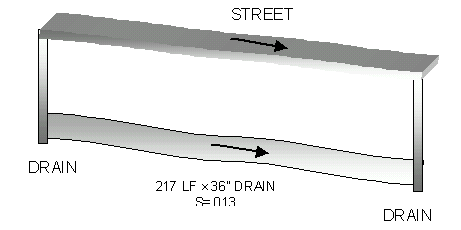
Hypothetically, under pressure and flowing full with a large storm event, the water overtops the drain inlets and flows downstream. In order to input the street flow you will manipulate parallel conveyances from manhole to manhole.
Bring up the conveyance S12A to S13A which corresponds to the first manhole to manhole conveyance in the organized list.
Note:
Drain inlet to manhole conveyances are generally not used for Overland Release because they run perpendicular to the street and flow. However, in situations where ponding is
occurring, some gutter flow modeling may provide better results.
Move to the Parallel tab in the Add/Edit a Conveyance Facility Parameter window and proceed to add to the list. It is important to pick a conveyance type and profile that most closely approximate the actual dimensions of the street. In order to proceed with this tutorial, you must go into Conveyance Type and select Composite Open Channel.
The desired channel section can be input to appear like the cross-section of the street you are analyzing. This can be accomplished by clicking on the
Add button in the bottom left corner. This will bring up the small window,
Channel X-Section.

Utilizing the Channel cross section input window will allow you to create your own open channel conveyance as well as topped channel conveyances. In order to make the conveyance, you must define at least 3 points. The maximum number of points is 100 but seldom are so many points required.
The standard method of dealing with street conveyances does not involve developing your own conveyance cross section each time, which can be extremely time consuming. Instead, click on
Get Channel Section From File and select Natskin.chn.
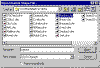
Once open, your screen should show the cross-sectional graph of Natskin.chn.
The correct window will show the following cross section.
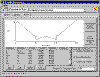
Notice that the points are predefined and that the general shape is that of a street with the curb at distances 50 and 100, centerline at 75 and the an overland slope leading to the curb on both sides. Of course you could redraw this cross section each time and manipulate it to serve your needs, but for most cases, you will create standard channel shapes and save them to a file, using them over and over again. The street section provided was used in North Natomas analysis of proposed residential streets.
Take a close look at the Distance to Reference Point box in the lower right corner. This indicates that the reference point is located at 50 feet or according to the graph, exactly at the
flow line of the curb. The lowest point in the cross section of the channel should always be used for this value. Note also that cross sections (and profiles) always start at X-coordinate = 0.


The importance of the reference point placed at 50 permits the channel profile to match up with the elevation at the bottom of the curb. For this particular system, it matches up with the drain inlet grate elevations. Matching the bottom of the curb to the
flow line elevation correctly models the open channel to your street.

Modeling street conveyances as parallels along manhole to manhole connections was previously mentioned. However, when inputting the conveyance profiles of these parallels, it might be more appropriate to use the gutter
flow line elevations adjacent to their respective manholes as your profile points since that will be the natural path of the water in the street.
The current conveyance, S12A to S13A starts with a RIM elevation of 218.79. This first value in the profile corresponds with the manhole. If the drain inlets are staggered, choose the drain inlet closest and perpendicular to the manhole. The first profile station should be simple.

The second station is a bit more difficult to define. A basic method is to take the conveyance to the next drain inlet elevation, S13B. When finished, your window should match the tutorial.
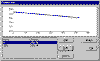
Save the input for this conveyance and move on to S10A to S13A. Utilize the same technique as the previous parallel and then continue to the next conveyance, S13A to S14A.
The approach to this parallel is slightly different. One method is to take the elevations from S13B to the centerline of the street (calculated from manhole and 2% side slope for the street) and then on to the drain inlet S14.
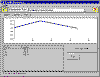
Notice the high point (centerline) between the two inlets above.
The parallel from S14A to S15A looks straight forward but remember to input the flow line
at S15A which is not 211.90 but rather 211.50 from interpolation. After inputting the corresponding data treat S15A to S15B as a street parallel in this analysis. Generally drain inlets are not associated with parallel but in cases such as this (when the main flow of water proceeds through a drain) it makes sense to create a parallel. Lastly, input a parallel for the connection between S15B and S16 which is overland. A typical way of modeling this conveyance is to start at the drain and include the curb and path in the profile. Look to the next profile to clear up any confusion.
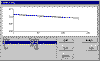
Change your jurisdiction file to ROSEV100.jur which is an appropriate 100 year storm event.
After a few calculations your summary table should have reached convergence.
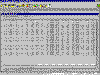
Be sure to save your file as Bstreet.prj. Keep in mind that street parallel modeling requires engineering
judgment and there may not be one “correct” method. Some modeling methods give more accurate results, others more conservative results; it is up to you to decide and develop a method that best suits the project you are working on.
Part C: Overland Release, Parking Areas (30 Minutes)
Following on the heels of street conveyances, parking areas require more attention when using composite open channels. The issue of main importance is that each parking area must be created using the cross-section editor.
The parking area tutorial is an example of overland release with the main emphasis on learning to use the cross-section creator.
Start with a new project file (exit the program and re-enter it). Open the Add/Edit a Conveyance Facility Parameter window for Convey 1 and get a Composite Open Channel for your Conveyance Type.
This screen should look familiar from the previous section on parallel conveyances. This time however, the cross-section will be input by data points only and then saved.
Note:
Most analysis of parking areas will not require the detail that this tutorial goes into. Engineering a “typical” representative channel shape and using it throughout (like with the streets) will save on input time.
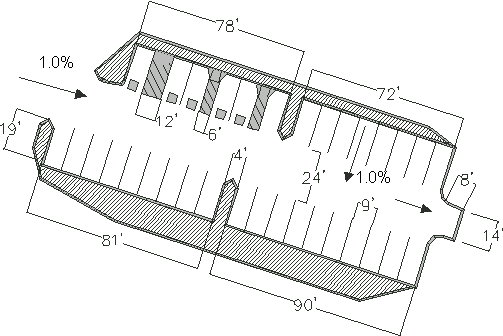 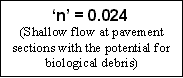
The parking area for this demonstration contains 28 spaces and 5 handicapped spaces. The water flow originates at the left opening and proceeds down a 1.0% slope to the exit on the right while a side-slope of 1.0% drains the water towards the centerline.
Visualize the 2-D CAD drawing as a 3-D object, and use it to create cross-sections of various dimensions.
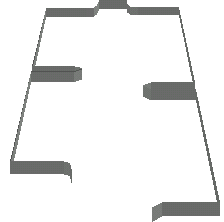
Eight nodes and seven conveyances are going to be used in preparing the project. The nodes are used in separating the points where the cross-section changes. These seven segments are going to be connected to form the entire parking area.
The total distance of the lot is 183’ so fix the grate elevation of the first manhole to 1.83 and the last node at 0 feet elevation based on the 1.0 % slope.
The table of distances to the right will represent the lengths of the conveyance segments. As an initial step, attempt to construct a cross-section for convey 1 which is currently open. Remember that your reference point corresponds to the place in the parking areas where the section will rest. A good rule to follow is to keep the reference consistent so the cross-section may be applied in future cases. In this example, making the centerline the reference point would give the same point of reference for each cross-section and might have applications in latter projects. For the purposes of this example, assume that all landscaped areas provide separate runoff allowing the parking area to act as a channelized response.
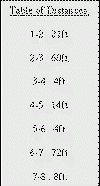
Note:
All necessary values including heights and distances can be extrapolated from the diagram and the given data.
From your edit window, click on Add to bring up the point editor.
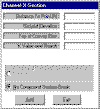
Use your general knowledge of cross-section entry to fill the blanks with the appropriate data from the diagrams and charts. The shape should be an identical match but the values do not have to be in the same place. Remember that the reference point for the duration of the tutorial will be at the centerline.
Note:
As long as the reference point is picked at the low point, it won’t matter if the cross-section contains negative values.
Once your diagram matches the figure in shape, save the channel section as leftind.chn, representing the portion of the parking area with a left indent.
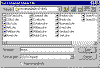
Save that conveyance and move to convey 2. It’s your option to rename the nodes but for this simple tutorial it adds to the time necessary to finish without adding any constructive help.
Proceed to the cross-section editor and manipulate the next portion so it portrays a section across the entire parking lot. The first input will once again be the top of the curb modeled as point (0,0) since it makes the numbers easy to work with. The second data input is the bottom of the curb and the third is the centerline. When you have finished inputting all five data points your cross-section should appear symmetric. The reference point remains the centerline, but will shift to distance 31 feet in this section.
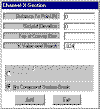

Save this section as standard.chn after pressing Save Channel Section to File.
As seen in the diagram, there are three remaining types of sections to construct. The first is a parking section where the curb indents on the right side and following the nomenclature this section file should be saved as rightind.chn. The next is a thin section with both a left and right indent which can be saved as fullind.chn for easy reference. If you are following the input method described in this tutorial, your cross-sections for these files should match those provided.

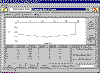
Now that sections have been created for conveys one through four, note that convey five has a left indent section. Since this section has already been constructed, simply get the channel section file while editing the conveyance. Convey six is similar in that it uses standard.chn which has already been made. Pulling these files from the hard drive is time effective and can significantly reduce the time necessary to analyzed more complex composite channels that have more developed cross-sections.
The last convey, number seven, is narrow and must be input. A simple procedure by now, add data points so yours matched this tutorial.
This section is very similar to standard.chn, but more centralized. Name this file center.chn and then save the conveyance.
With the difficult task finished, go to the main Node spreadsheet and fill in the grate elevations for each node. The slope of the parking area is 1.0% and the distance between
nodes (same as conveyance length) are given in a table. Calculate the values for elevation by hand, calculator, or computing device and type the largest value for node 1 decreasing till node 8 has 0 elevation height.

The last step to model the parking area is to define the conveys and provide the conveyances with profiles. The profile input should be simple since the station heights correspond to the node grates and the distance is the length between nodes. Check your Convey spreadsheet with the one provided.
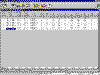
The parking area has now been modeled, but as yet, no flows can be calculated. The development of the parking area has led to succession of conveyances running the entire length without any contributing areas or alternate systems. Many different circumstances could change this procedure if it were to be used in a real situation. Contributing flow could be integrated by either changing a manhole to a drain inlet or connecting the upstream node(node1) to an existing system that had flow. The parking conveyances could also be used like a parallel conveyance for overland release. Instead of adding a parallel to an existing conveyance, insert the parking area as an additional. Since the nodes are defined only for the conveyances just made, they won’t conflict with any underground manholes or inlets.
Quick and Dirty vs. Accuracy
Another way to model the parking area would be to use a triangular channel with a 1.0% (100:1) side slope the length of the parking lot. This would only be a more general approximation of the flow but is quicker and simpler than constructing a composite open channel. However, this channel would not model the converging flow where the parking islands encroach. Most cases will yield almost identical results as when a constructed composite channel was computed.
Advantages for making a composite open channel for parking areas exists when there are any changes in the ‘n’ value and where using a standard channel shape would be inadequate to properly show the conveyance.
Closing Comments
Parallel conveyances and multiple pipe culverts are essential in developing an accurate model for large storm events. They dictate where the flow will go above ground and are key in determining flood depths. Hopefully these tutorials on overland release modeling will help you utilize these features of CS Drainage Studio to their fullest capacity.
Back to Top
TUTORIAL 6 - SIMPLE DIVERSIONS
Part A:
Types of Diversions (10 Minutes)
The diversions referenced in the tutorial section must be applied to the nodes
themselves. Diversions act to monitor and proportion the amount of flow
contributing to each node and diverting to other nodes.
As runoff is collected it proceeds overland and through channelized responses
following a path towards an inlet into the system. At that inlet the water would
follow one or both flow paths. The first path allows the water through grates
and curb openings and into the inlet and drainage systems. The second path will
bypass the inlet with all or a portion of the flow. In the most general case,
all the water enters the inlet. In instances where not all the water can enter
the inlet, the bypassing flow will continue to the next node. This process is
called a “bypass diversion.”
The flow may sometimes pass by the inlet but is curbed by excessively high
street slopes so the flow must settle around the original inlet. This is
referred to as a sag diversion.
Sag diversions provide interesting analysis assuming that all flow up to a
certain depth will enter the inlet and that all flows above that depth will be
diverted such as when the height of the street and the top of curb are taken
into account. As the water pools around the drain inlet the water level
increases adding to the amount of flow entering the inlet. Part of the input
needed to properly analyze a sag diversion are the heights of the street
overtopping locations relative to the rim elevation because the rising water,
once over the street height would flow on to the next inlet. This reaction is
termed a partial sag diversion because it initially allows the water to pool
until a specified depth, then excess water is released as a bypass to the next
inlet once the depth is exceeded. More on this topic is covered in Tutorial 8,
Sag and Sump Inlets.
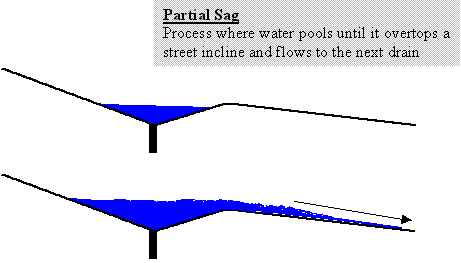
Critical in flow analysis and flood forecasting, diversions are complex but
worthwhile features to incorporate in your analysis.
Application
Open LessonB.prj from the file menu. In addition, pull out a copy of the Lesson
B Sample System diagram which is page three in the set of diagrams.
Notice that the street sections leading up to inlets 12 and 10 are not marked,
so for the purpose of learning diversions, move on to inlet 13B. A 1% slope
occurs on one side of the inlet and a 2% slope on the other. By sight, this
inlet will be a Sag. Upon further examination, the height required to flow to
the next inlet would be the centerline of the street since the inlets 12B and
10C have a much higher elevation. Instances such as this are an example of a
Sump Inlet. Partial Sag Inlets occur when the flow could go to another inlet on
the same side or could cross the centerline to another inlet.
In order to input this information, click on the S13B node from the main Node
spreadsheet window. Press the Flow Diversion tab that is located in the lower
right corner of the Add/Edit a Node Element Window.
The first step is to find out which inlet would S13B divert to if it would
overflow. Earlier a distinction was made between Sump and Partial Sag by the
ability to overflow beyond the street overtopping height. That statement is
still true but there is a fine line defining the two. Partial Sags only apply
when the height they must top is less than the maximum depth specified. The
software automatically determines if you have a sag or partial sag inlet.
The pull-down menu next to Divert Discharge to Node is for any type of diversion
and must be filled in with a node to continue. In the case of a Sump it
represents the case where extremely high water levels exist and you must decide
where the water would go. Looking at the Lesson B Sample System, the water will
tend to divert to inlet S14C because excess flow will move towards the side with
the 1% slope and cross the centerline closer to S14C.
Click on the Divert Discharge to Node list box and scroll down until you stop on
S14C.
The Flow Diversion Rating Curve Editor works much like the Composite Open
Channel Editor which you worked with in Lesson B. The more time intensive option
is to make your own curve with data points each time that can be loaded and
saved as typical data representative of your project.
The editor uses data points that can be manipulated from the buttons underneath
the table allowing you to Add, Edit, and Delete. Prior to making your own curve,
you must choose which kind of diversion this will become and select it from the
choices.
Your choices are between sag diversions or bypass. The lowest box, Slope of
Inlet Grate allows you to input the slope of the street that leads right up to
and beyond the inlet for bypass diversions only. In most cases, the street slope
is appropriate but in cases where the inlet is recessed it can sometimes be more
accurate to give the slope of the recess rather than street leading to the
inlet.
Note:
The option to chose Normal Diversion (HGL Based) is misleading. In a previous
version of this software it was used to allow diversions within drainage
systems. This feature will not work with the current version of the software. A
totally new method for calculating internal diversions will appear in future
versions of CS Drainage Studio. The remaining options, Sag and Bypass Diversions
are surface diversions only.
Once the type of diversion is chosen, you can open the data point editor by
clicking on Add.
The Depth box in the Flow Diversion Stage-Discharge editor is made to input the
depth at which the flow in cfs is accumulating at the inlet. The second box is
where the representative flow value can be input.
Input the following data to see the resulting curve.
 When completed the Sag Diversion curve should appear in the graph window, but if
it does not simply press the Graph button.
 The method for saving your curve is the same as a composite channel. Click on
Save Channel to File and the save window will appear. Any diversion you save
will have the extension *.dv1. Feel free to save this example with any file name
or delete the diversion.
Part B: Bypass Flow Inlets (10 Minutes)
The more common way to obtain your grate capacity curves is from a file using
Get Channel From File which allows you to utilize a pre-made diversion curve
appropriate to your project.
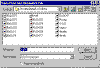 Open the file labeled By2x310. While the names may appear confusing, all the
diversion files provided with the software have been named for ease of use. The
file that you just opened tells you that it is a pre-made bypass diversion for a
drain inlet that has a 2ft. by 3ft. grate opening and has a 1.0% slope across
the inlet.
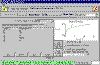
Slope Examples
When viewing an inlet from a plan and profile print check the inlet profile
first to see whether a drop occurs from street level or if it is flush. If a
drop exists, use that slope as the Slope of the Inlet Grate located in the
bottom right corner. That value can be changed at any time to reflect your data.
Note:
You should verify whether the inlet capacity curves being used take the recessed
inlet grates into account. If they do the street slope should be used for the
bypass.
If the inlet is flush with the street take the slope of the street leading up to
the inlet. For example, a 2% slope changes to a 1% slope ten feet before the
inlet. Use the 1% slope.
In instances where two slopes are going to a bypass diversion an average of the
two can be used if the grade break occurs close to the grate location within the
flow transition. It may be preferable to assume that the flow transition has
occurred and use the slope at the inlet location. Caution should be used because
most times when two slopes come together the diversion is a sag rather than a
bypass and they do not use slope in their calculations.
Part C: Sag and Sump Inlets (10 Minutes)
For the example Sump diversion at S13B, a sag file would be more appropriate
that a bypass. When you click on Get Channel From File again your options for
sag diversions are much smaller. This is because slopes don’t matter for these
sag diversions where in the case of bypass it can make significant
differences.
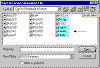
The first sag diversion, Rssag, is a sag for a City of Roseville standard type B
inlet. The other files are sag curves for other agencies.
You can make and save diversion curves for specific agency regulations and Civil
Solutions keeps a database of available files which you can add to and download
from our website. Downloadable upgrades for diversions are available at the
website www.civilsolutions.com.
Since LessonB.prj is assumed to be a City of Roseville jurisdiction project,
choose Rssag as the diversion.
 Save this node and proceed to the next diversion at either S14C or S14B. Both of
them are bypass and can be modeled with a 2% slope. These inlets diverge to S15B
which can be seen by following the path of the water. The last node with a
diversion is S15B which is a sump and can use the same diversion file at S13B.
Partial Sags are not apparent in the system but they are common in other
residential and commercial developments. If you were to model the partial sag,
use one of the standard sag files available, just as you did for the sump nodes
S13B and S15B. Then determine the maximum height with which the water would
overtop the sag. When the value is less than 1 foot then click on each
individual depth point and click delete.
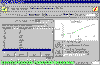 After doing this multiple times until the largest depth value is the height
required to pass over the sag then you have completed the partial sag
diversion.
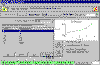
Note:
You may have to click on Sag Grate Diversion Type and then press the Graph
button before the diversion will appear in the graph window.
Return node S13B to its correct sump diversion information. This can be done by
reinstating the Rssag file from Get Channel From File.
There is no noticeable change to the Node spreadsheet after inputting all the
diversion types. There will be significant changes, however, when the system is
calculated. Press the full calculation button and the Global Parameters window
appears.
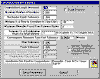
Indicate that you want diversions to be part of the calculations by clicking on
the empty box next to Enable Diversions in the upper right corner. Then press on
the Save Parameters button. Pressing the single iteration button five or six
times after the first calculation should bring the system to convergence.
Diversions will only be computed when diversions are enabled. When this is done
the information will be displayed on the Diversion Summary which is the last tab
on the Results Printout Information spreadsheet.
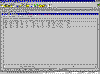
The information that can be interpreted from the Diversion Summary is that the
diversion did not greatly affect the flow of the system. The added Q values were
low and depth at the inlets did not show more than .36 feet. This depth might be
satisfactory at most locations but would definitely show an encroachment into
the travel way.
Closing Comments
Diversions affect the analysis of a completed system. They can create the need
to change entire systems if bypasses are significant or if the water pools too
high and encroaches into the roadways. Diversion calculations may also show a
need for gallery inlets or supplemental inlets. Diversions are crucial to the
non-visual aspect of CS Drainage and are powerful tools in meeting government
guidelines. For high flow events it may be preferable to disable diversion when
computing the system with parallel flow since this will force all runoff to
enter the system at the upstream inlet locations. Back to Top
TUTORIALS 7-11 are under construction, sorry for the inconvenience.
|